Readdle’s PDF Expert 5 is 50% Off

PDF Expert 5 by Readdle is on sale for $4.99 (50% off) right now. Here’s my video review from last fall of PDF Expert 5 on an iPhone (make sure you use the settings gear in the embedded video to watch in HD; you can also view full screen). The app is universal, which means you buy it once and then can use it on iPad and iPhone. Go here to find the discounted app.


AppTastic Tuesday: Ulysses (Part 1)

Ulysses-Mac-1024x1024


There are two things that seem to be all the rage in the world of writing and software: (1) Markdown and (2) “distraction-free” writing environments.

I’m more interested in the latter than in the former—I’m actively trying to root out distractions wherever they may be found. But Markdown is easy, everywhere, and seems a good way to explore learning other, more complex coding languages.

Ulysses offers both, and then some, with the goal of eliminating anything that takes the writer away from her or his craft of constructing words, sentences, and stories.

In fact, I’ve written and edited this post in Ulysses, then exported it as html into my WordPress blog.

In this review post and a second follow-up entry soon to follow, I write about:

  1. Getting Text Into Ulysses
  2. Ulysses as a Writing Environment
  3. Getting Text Out of Ulysses
  4. Ulysses as a Writing Experience


1. Getting Text Into Ulysses


Good writers need good tools, so a serious scribe will take time to track down a trustworthy tool, but one does want to be able to just open whatever program and start writing.

Getting to a new Sheet (Ulysses’s more-or-less equivalent of a document) is easy, even with no experience of the app, so one can just start writing in the default three-pane workspace:


Ulysses Three Panes


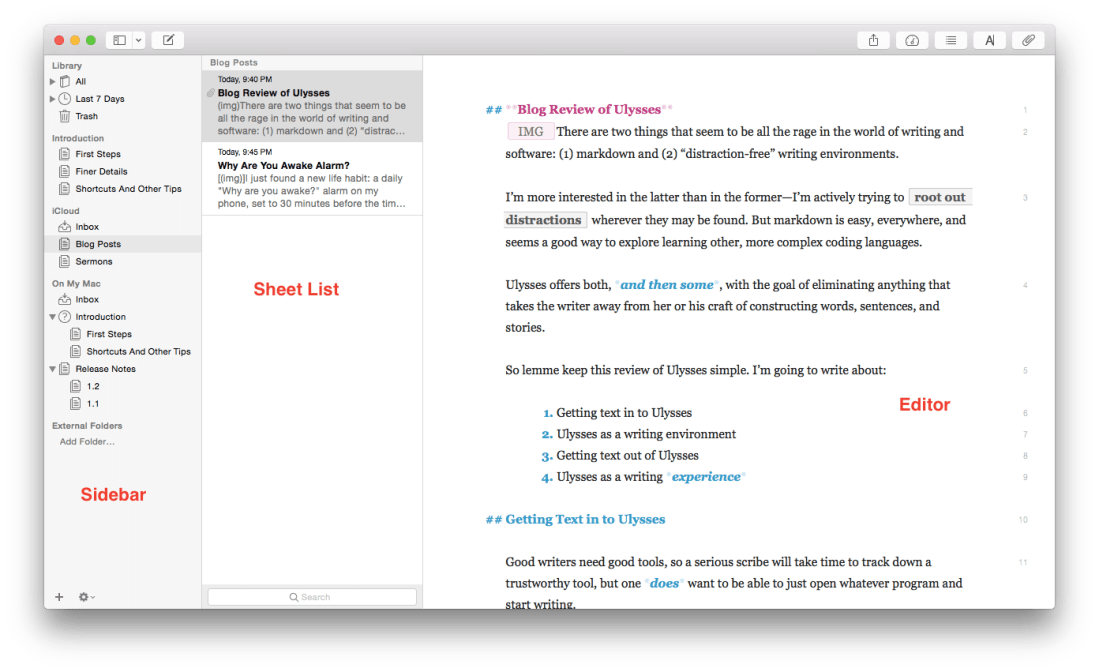
The Editor is where the magic happens (i.e., you write the stuff). Using keyboard shortcuts or the menu bar, you can have one, two, or three panes visible. If you’re really hunkering down, you might not need to see your Sheet List, so can go to the Editor Only view.

However many panes you want to see at once (and Ulysses also allows multiple Windows open at once), starting to write in Ulysses is easy.

But what about importing text you’ve already got somewhere else?

Easy (mostly). You can copy-paste, even preserving formatting, or you can import a file wholesale by dragging it from a Finder window into the Ulysses sidebar, if it’s of the kind Ulysses will recognize. (My .zrtf Nisus Writer Pro tests did not work, but Ulysses did accept a sample .rtf file and even a Microsoft Word .docx file.)


2. Ulysses as a Writing Environment


So you can get writing right away in Ulysses, either from scratch or from pre-existing projects in (some) other formats. That’s a plus.

Writing in Ulysses itself has been a very positive—even a focusing and relaxing—experience. More on that in the next post. Ulysses as a writing environment requires some effort to learn.

For example, there’s the terminology (Sheets, Groups, Filters), though that’s pretty easy to pick up right away. And there’s the three-pane layout—though Mac Mail and other apps have prepped users for that. There’s also the lack of tie-in to the Mac Finder and files with file names.

That has taken some getting used to, but it’s not cumbersome by any means. In fact, Ulysses’s powerful search option (⌘-O) has meant I can always find anything I am looking for—quickly.

One nice touch in the app is that there are three Groups full of explanatory Sheets that tell you just about all you need to get started:

  1. First Steps
  2. Finer Details
  3. Shortcuts And Other Tips

Here’s what they look like (in the easy-on-the-eyes Dark Mode with Dark Theme):


Ulysses Dark Mode


They’re like help files, only more fun and experiential.

Note also the fourth pane at far right, where I have added some Keywords (“I read this”—I have used that as a label to track my progress through the help Sheets) as well as a Note. Via this Attachments Bar you can also add an image or set a word count writing goal for yourself.

And the app can do some pretty sweet stuff. Here’s a sampling:

  • You can select a couple of Sheets and “glue them together” using ⌘J, which is good for putting chapters or sections together
  • You can split a Sheet into two Sheets, which is what I’ve done with this blog post that started as one and now will be in two parts
  • From the Editor (the pane where you do the writing) you can go up and down your various Sheets using the ⌥⌘↓/↑ keyboard shortcuts
  • The Show Markup option (keyboard shortcut= ⌘-9) is really helpful, especially to folks like me who are new to Markup
  • Did I mention how easy on the eyes the Dark Theme/Dark Mode option is for nighttime writing?
  • You can make comments to yourself using Markup that will show in the Editor pane but won’t export when you’re ready to publish

There are many more features listed here.

The few things that at first seemed like limitations in Ulysses were, in fact, easy to pull off by selecting the right menu item.

I haven’t been able to find anything like navigation arrows in the toolbar—having these readily visible would easily allow one to move between Sheets and search results without having to have two app windows open at once, but there may be a solution I just haven’t found yet.

So far, though Ulysses has required some adjustment to my workflow, I’ve really been enjoying writing in it.

My Ulysses Statistics are telling me this post has exceeded 900 words, so I’ll write more next time about (3) Getting Text Out of Ulysses (i.e., export functions) and (4) Ulysses as a Writing Experience.


Thanks to The Soulmen Gbr, developers of Ulysses, for giving me a download for the review. See my other AppTastic Tuesday reviews here.

AppTastic Tuesday: Say & Go

Old Confidant
Old Confidant

Back in the days before Facebook and iPhones, I walked around my college campus with a mini-cassette recorder to capture my freshman year pontificating about all aspects of life. It’s amazing how lengthy and involved some of those reflections were.

After a while I started holding forth verbally less and rocking out musically more, using the recorder to get all my songwriting ideas down right away.

For as advanced as the iPhone is–and it includes a built-in voice memo recording app–it wasn’t until I started using the app Say & Go that I started treating the phone as a suitable replacement for that Sony tiny tape recorder.

First, let me show you how I use the app, then I’ll show you a few of the under-the-hood settings you can tweak.

A brilliant idea comes my way, I grab my phone, and launch Say & Go:


From Skitch


Because of how I have the app configured, the second I tap the app icon, it starts recording:


IMG_3272


The app intentionally limits recording length to anywhere between 4 and 15 seconds. I find 9 seconds is a good amount of time to get most ideas down. But what if I want to record a song snippet?

I can simply swipe right or tap on “Longer Recording” in the image above to get a minute-long option:


IMG_3273


As if this isn’t sleek enough (and what a sweet, elegant layout this app has), the best part of the app is what’s next: I can now send my recording to an email address of my choosing, or set the app to save the recording to my Dropbox or… wait for it… to Evernote.


IMG_3276


All I had to do was enter my Evernote email-to address in the “Default E-mail Recipient” line above. Now, after a single tap on the icon on my home screen, all my recordings go straight into Evernote as soon as the recording time runs out. Impressive.

There are a few other customizable settings. In the short workflow described above, I have “Autostart” enabled, but you don’t have to:


IMG_3275


And here are some of the other settings you can adjust:


IMG_3274


It’s a brilliantly designed and useful app. Read more about it here.


Thanks to Dawid Pietrala, the developer of Say & Go, for giving me a download for the review. Check out the app’s iOS page here. See my other AppTastic Tuesday reviews here.

AppTastic Tuesday: OfficeTime Time Tracker

The best iPhone time tracker I’ve seen is OfficeTime. It is simple, fast, effective, and easy to get in and out of quickly to start tracking time and get right back to work.


OfficeTime Screen


You can set up your Projects and Categories (I use these as two levels of task grouping), and tap on each to see how much time you’ve spent in a certain part of your work. I don’t use the Expenses feature of the app, but if you were a sub-contracting consultant keeping track of work for multiple clients, OfficeTime would be immensely helpful in tracking billing.

Pulling up a new time/task entry is easy:


OfficeTime timer


“Notes” allows you to write more details about what task you’re working on.

Not only can you look at all your time entries in a week by Project and Category, but you can see (as below) a virtual Timesheet of your week.


OfficeTime timesheet


The iPhone app can sync automatically to the desktop version of OfficeTime, though you have to actually be on the same wireless network to do it. Similarly, the iPad app can sync to a computer (and vice versa), but the data cannot sync automatically between iPad and iPhone apps. That is one of the few drawbacks I’ve found in OfficeTime.

I’ll post more in a future review about the desktop app, and also report back on exporting features.

The lack of a full-bodied sync option hasn’t really stopped me, though, since I can keep all the data on my phone and then sync with my work computer when I’m in the office.

OfficeTime has a free Mac trial version, and a free iOS version to try here. The paid iOS version is $7.99 and works on both iPhone and iPad.

If you are the time tracking sort, and want a full-bodied way to keep track on the go, OfficeTime officially rates the Words on the Word title of AppTastic.


Thanks to the makers of OfficeTime for giving me a download for the review. Check out the app’s iOS page here. See my other AppTastic Tuesday reviews here.

iOS and Mac App Store “Get Productive” Sale

Get Productive App Store


Don’t spend too much time checking out new productivity apps (hint: that’s an easy time drain to rationalize away), but if you’re looking for a calendar app, a to-do app, or even a couple good desktop clients for blogging, there are some good options for iOS and OSX on sale right now.

The iOS sale includes Calendars 5, Fantastical 2 (my new go-to calendar app), Workflow, Duet Display (lets you use your iPad as another screen for your computer), and a handful more. You can find them all here.

The Mac App Store sale includes Blogo and Desk, two sleek apps that let you post to your blog from a desktop client. Both are half off, and you can see the rest by going to the “Featured” section of your App Store computer app.

A Chore Chart and Allowance Tracker–on Your Phone


iAllowance Logo


Sure, there’s a chance that over-reliance on a monetized chore chart can have negative effects on children. But we parents also want to teach our kids about the importance of work, responsibility, and the basics of financial management.

There’s still not an iPhone app for making you a better parent. In fact, probably less time on apps in general makes better parents. However, a number of us moms and dads already spend time each day managing tasks, finances, and other activities on a phone… so why not a chore chart?

Enter iAllowance.


Home Screen


Those are my sweet kids (names blurred out–you see their names on the app).

They’ve got their own corner of the app where we track their stars (earned or docked for behavior) and money (allowance, and stars converted to money).

The app has a bunch of pre-set chores you can select to track for each kid–at a frequency of your choosing.


Chores
(The spotting by the time is not from the app–that’s where the child’s name goes)


And you can add your own. (We added, “Make the bus on time”–everyone gets a star when that happens!)


Choose Your Own Chores


You can set how many stars equate to a monetary amount, and then have the app make the transfer for you. We were paying our kids 10 cents a star, but we were doling out a lot of money! So we changed it to 5 cents a star.

You can also set up different accounts for each child. We have one for Church, one for Savings, and one for Spending. The Totals screen shows you all that, as well as Stars and Time (one of the few features I haven’t used in the app):


Bank Totals


iAllowance is a really a great (and fun) app. It syncs via Dropbox or iCloud with an iPad. As a universal app, if you buy it, you can use it (and sync it) on any iOS device.

The kids love it, too. It’s been an effective motivator, and really fun for them to tap their stars at the end of the day–or tap on “Bad Behavior” and see a frowny face. 😦

Any time you tap next to a chore (which you can do in the Day view or Week view) you get an accompanying sound effect, too. And the allowance deposits happen automatically, in the amounts and to the accounts that you specify.

The app runs smoothly, and the developer is one of the most responsive (if not the most responsive) developers I’ve ever been in touch with.

I can’t say whether a incentive-based program will work for you and–if it will–whether you should run it from a mobile device. But I can say that both the overall setup of stars and allowance, as well as this particular app, have really helped perk up some listening ears around here!

Now… I’ve got to go give myself a star for posting another Apptastic Tuesday review, Blizzard 2015 notwithstanding.


Thanks to the developer of iAllowance for giving me a download for the review. Check out the app’s site here. You can find the full (paid) version here, and try the free version here.

AppTastic Tuesday: Captio

Captio iconLast week on AppTastic Tuesday: Rules! This week: Captio.

The goal of Captio is a simple one: to very quickly pull up a screen into which you can type text or stick a photograph, and then email it to yourself.

It works in iPhone in both portrait and landscape mode. Here’s the New Note screen, which lets you (a) enter text, (b) select a photo from your phone, or (c) take a new photo:


New Note


You might quickly pull up Captio to jot down a reminder or bit of information you want to access later. Then you tap Send, and your text or image is sent to your email address.

You can adjust some settings–for example, have a prefix of “Captio” or “Remember” or anything else in the subject of the email that Captio sends:


Formatting Options


And, what is best, you can send it to any email address. This is especially helpful if you have a to-do system (like Evernote or OmniFocus) that allows you to email items directly into those apps.


Email to Send to


This is where I’ve found Captio most useful. It can take Evernote and (especially) OmniFocus a few seconds to load and sync–Captio, by contrast, gives you a text entry screen as soon as you tap it.

Captio is also available within other apps via the Share Extensions:


Share Icon


Share icon 2


I’ve not personally seen a need to use the Share Extension–it works great, but if I’m saving a Web article to read later, I’ll just use the Evernote Share Extension anyway. Or the OmniFocus Share Extension to create a task from a photo. But for folks who primarily rely on email to keep reminders (not a good idea, but a widespread practice), Captio can help from just about anywhere on your phone or iPad.

Captio also stores all the notes you send, right on your device, so you can use it with or without Internet/data connections.

And, though all the shots above are from an iPhone, Captio is a universal app. So for $1.99 (at the time of this post), you can use it on both iPhone and iPad.

Thanks to the makers of Captio for giving me a download for the review. Check out the app’s site here.

AppTastic Tuesday: Rules!

Today begins what will be a mainstay of Words on the Word in 2015: AppTastic Tuesdays. First up: the iOS app Rules!


Rules Pile of Animals


Rules! is part zone-out tapping, part memory-training app. The gameplay itself is fast-paced, fun, easy, and aesthetically pleasing. Watch this short trailer to get caught up:


The actual tapping of icons is easy–the game is quite touch-responsive and fast. And the rules are clear enough:


Tap Odd Numbers


When you complete what rule 1 calls for, you move up to rule 2. Having completed rule 2 on the screen, you then apply rule 1 to the remaining icons. There are 100 levels of rules, though I have barely made it past 15.

When the game introduces a new rule, you get a screen like this:


Rule 13 Icon


But then after completing rule 13, it tells you simply, “Now follow rule 12,” “Now follow rule 11,” “Now follow rule 9,” and so on.

So it’s more than about the gameplay itself–you’ve got to memorize the rules as you go; you’ve got to know them by number.

This makes it a less-than-ideal zone-out game. Threes is by no means boring but mindless enough that you can come home to it at the end of a long day. Rules! is not so. It demands more of your mind.

You will probably find yourself, as I did, using some mnemonic device to remember 8-10 rules at once, so you can perform the appropriate actions on the screen in front of you.

There are three game modes: Beginner, Expert, Timeless (i.e., no countdown clock). The scoring rewards you for speed and accuracy:


New High Score


The need to memorize a host of rules in order to do well caused me to lose interest more quickly with Rules! than I have with other iOS games.

But Rules! especially excels in two areas: (1) its accompanying music is pretty, well-written, and good for focusing, and (2) its layout and design is gorgeous. Even the fail screen looks good:


Time Is Up


So, for $1.99 in the App Store, if you’re up for a mental challenge with good music and beautiful design, check it out and see if you can–as one player on Twitter recently did–get through all 100 levels.


Thanks to the makers of Rules! for giving me a download for the review. Check out the app’s site here.

A Bundle of Septuagint Resources in Olive Tree, Under $50

Rahlfs LXXWant to read the Old Testament in Greek on all your devices? This is the cheapest way I’ve seen to get started: until midnight PST tomorrow (1/6/15) night, you can get this Septuagint bundle for less than $50. It includes

  • The Rahlfs-Hanhart Septuagint text
  • Its critical apparatus
  • The Kraft-Wheeler-Taylor parsings of each word in the text
  • The LEH Greek-English Lexicon of the Septuagint (Lust, Eynikel, and Hauspie)

This is really an incredible deal, given that the Rahlfs-Hanhart text in print is about $50 (and doesn’t include running parsings). The LEH Lexicon in print runs anywhere from $40 to $80.

What can Olive Tree do, you ask? See my gathered posts here, including my recent review of a five-volume dictionary set that is still on sale.

The advantage to having the above combo in Olive Tree is that you can tap any word in the Rahlfs-Hanhart Greek text and get instant parsing information.


Parsing


You can instantly access that word’s lexical entry in the LEH lexicon. I especially appreciate LEH’s inclusion of word frequency counts, according to sections of the LXX:


LEH Entry


Using the split window setup, here’s what the Rahlfs text with apparatus looks like:


Rahlfs with Apparatus


Though Rahlfs never intended his apparatus in this volume to be fully critical, it does help you at least compare LXX readings as found in Vaticanus (B), Alexandrinus (A), and Sinaiticus (S).

And because Olive Tree is fully cross-platform, you can sync any notes you take or highlights you make and they appear on any device on which you have Olive Tree.

Find the whole bundle here, on sale for just a little while longer.

New Interpreter’s Dictionary of the Bible, $99 in Olive Tree

NIDB Olive TreeAn underrated but really good Bible dictionary is the New Interpreter’s Dictionary of the Bible (NIDB). Published by Abingdon, the five-volume set is edited by Katharine Doob Sakenfeld and includes contributions of nearly 1,000 scholars.

For a short time the dictionary set is $99.99 in Olive Tree Bible software. Below I offer–from my perspective as a preaching pastor and Bible reader–my take on the set, with a focus on Olive Tree’s iOS Bible Study App.


What The NIDB Is and How It Has Helped Me


There are more than 7,000 articles in NIDB. The contributing scholars are diverse in terms of gender, ethnicity, and denominational background–a refreshing mix of voices. The dictionary balances reverence for the biblical text with rigorous scholarship–though the dictionary is rarely arcane.

The NIDB has been eminently useful to me in my weekly sermon preparation. Last fall, for example, when preaching through Genesis, I knew I’d have to make sense somehow of the “subdue” command that God gives the first humans regarding their relationship to the earth. The dictionary’s “Image of God” entry helpfully clarifies:

While the verb may involve coercive activities in interhuman relationships (see Num. 32:22, 29), no enemies are in view here–and this is the only context in which the verb applies to nonhuman creatures.

The same article puts nicely the implications of humanity’s creation in God’s image: the “image of God entails a democratization of human beings–all human hierarchies are set aside.”

This sort of blend between technical detail and pastoral application is present throughout the dictionary.

I’ve also found useful background for my Greek reading. This year, for example, I’m reading through the Psalms in Greek with a group of folks (see here). In the “Septuagint” entry in NIDB I find this:

The 4th-cent. CE “Codex Vaticanus” contains all of the books of the Hebrew Scripture or Protestant OT, and the following material that is today classified as deuterocanonical: 1 Esdras, 2 Esdras, Ps 151, the Wisdom of Solomon, Ecclesiasticus or Ben Sirach, the additions to Esther (several of which were originally composed in a Semitic language; others of which are original Greek compositions), Judith, Tobit, Baruch, the Letter of Jeremiah, and the additions to Daniel (Azariah and the Three Jews, Susanna, and Bel and the Dragon).

The entry goes on to describe other Septuagint manuscripts, with hyperlinks in Olive Tree to related entries.


iOS Features in Olive Tree


Olive Tree logo


Olive Tree is as cross-platform as a Bible study app gets: it runs on iOS (iPhone and iPad), Mac, Windows, and Android. The app itself is free, and you can get some good texts free, too, so you can preview the app before you buy any resources in it.

I’ve got the Olive Tree app on Mac, iPhone, and iPad Mini. It’s one of the best-executed iOS Bible study apps I’ve seen. It is visually appealing, highly customizable (especially with gestures and swipes), and easy to learn.

When reading the New Interpreter’s Dictionary of the Bible (or anything else), here are a few features that have impressed me:

You can navigate with “flick scrolling” (how iBooks is set up) or “page scrolling” (like Kindle). This will make just about any user feel at home in the app. Flick scrolling (how you’d navigate a Web page) feels more natural to me, so I use that.

Dictionary entries are easy to get to. You can simply tap on “Go To” and type in the entry you’re looking for. The auto-complete feature saves having to type very much on the iPhone’s small keyboard:


NIDB Go To


You can search the entire contents of NIDB by word. If I wanted to see not just the entry for “Septuagint,” but every time the NIDB mentions the Septuagint, I would simply type that word in to the search entry bar:


NIDB Search


Then I can select a result and read the given entry.

The full-color photos are zoomable. The NIDB contains full-color photographs that help visualize various entries. You can select the photograph and pinch-zoom for more detail.


NIDB iPad


I’ve noted this before–there is a great deal of customizable “Gestures/Shortcuts” preferences in the “Advanced Settings” menu. Olive Tree is the most versatile Bible study app in this sense. For example:

  • Two-finger swipe left and right takes you through your history within the app. I can swipe between NIDB, and the last NIV Old Testament passage I was reading, and a commentary, and…. No need to go through menus.
  • Two-finger tap gets you from any screen to your library; right away you can get at your other resources.


Concluding Assessment and How to Buy


One of my favorite features of Olive Tree’s apps is that you can view two resources at once that aren’t tied together by Bible verse. It’s like having split windows on an iPad. So you can have the NIDB open in the top half of your screen, and a Bible text or other resource open in the bottom half–even to unrelated topics if you want.

The New Interpreter’s Dictionary of the Bible is about as good a Bible dictionary as you’ll find. If you can use it to complement the Anchor Bible Dictionary (also available in OT), you’d be very well set with Bible dictionaries.

Olive Tree has done a great job, especially with its iOS apps. As much as I loved my print copy of NIDB, I unloaded it not long ago since I can essentially carry it around with me now. And getting at its contents is even easier with the enhancements Olive Tree provides.


Thanks to Olive Tree for the NIDB for the purposes of this review, offered without any expectations as to the content of the review. You can find the product here, where it is currently on sale for $99.99.