You can almost make the iPad your only computing device if you’re a writer. You can certainly make it your primary one, especially if you’ve got a good external keyboard. The multi-tasking option of the upcoming iOS 9 will be another step forward for those who wish to go the iPad-only route.
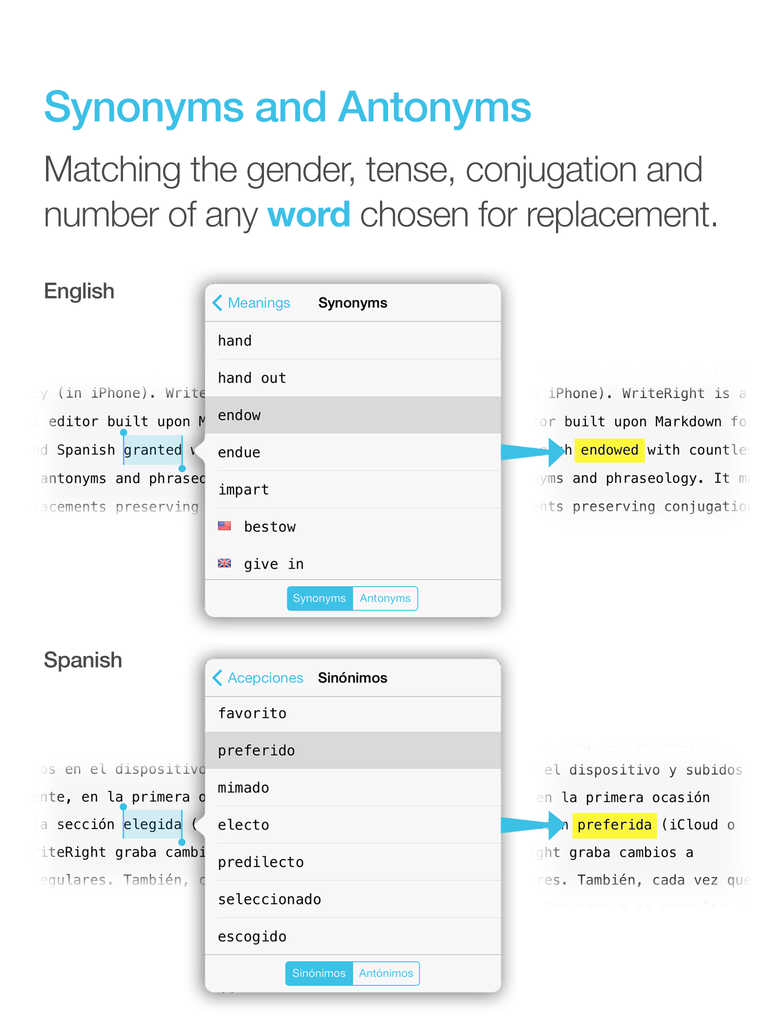
That said, the built-in operating system does not have a way to fetch synonyms for you. You can tap on a word and select “Define,” but there’s no synonym option.
It’s a plain-text, Markdown-enabled writing app. On the one hand, the App Store has a lot of these. On the other hand, it has some unique features. For instance, I click on the gear icon in the extended keyboard, and I see little gear icons above a couple words. Tapping one of those gives me phrase substitution suggestions:
The extended keyboard is succinct–just one screen on an iPad in landscape mode. But if you tap on an asterisk, for example, you get multiple Markdown options:
There’s a handy find-and-replace feature, too, something lacking (or not easily accessible) in other similar apps:
And, of course, the synonym/antonym feature is a boon to writers. It’s available in both English and Spanish.
Integration with iCloud and Dropbox is implemented well. And because you’re dealing with Markdown, you can easily work on the same document via Dropbox in WriteRight and many other writing apps. I could finish a document, for example, on Ulysses on my computer, if I wanted to.
The real-time word count (and character count, for that matter) is easy to see and helps with any writing targets you may have.
The app in general feels well-designed. It’s got some nice touches that the regular user will enjoy discovering along the way–like the option to swipe left and right for undo/redo, and a number of other minor features that enhance the writing experience.
What I Find Lacking
Between Drafts and Editorial and 1Writer, I’ve become used to inline Markdown previews, which WriteRight does not have. It’s not a huge loss, but you do have to be comfortable reading Markdown, or else going back and forth a lot between the Edit and Preview windows, if you want to see what your finished text will look like. The multiple Preview options are nice, but inline Markdown preview in a future revision would be handy. If this is a deal-breaker for you, you might struggle to use WriteRight.
I happen to like the Menlo font, but I sometimes like to write using other fonts–WriteRight doesn’t give you the option to change what font you use in the Edit window, i.e., where you do your writing. You can change font size but not style.
That said–even if I’m not jumping to switch to using WriteRight as a primary writing app, its unique features and Cloud-sync capability mean that it has its place as a nice pre-publishing app, to use after I’ve written all my text and before I export and print (or save, or send on to someone). At $2.99, the synonym/antonym and find-and-replace features make it a useful tool in the writer’s tool belt.
Find the app (for iPad and iPhone) in the App Store here.
Thanks to the makers of WriteRight for the free download for the purposes of review.
Writing Goals on iPad (Image Via Ulysses/The Soulmen)
Ability to export to Pages–this .docx export ability is great (and includes Word), but unfortunately instead of offering it alongside .rtf export, that latter option has been eliminated now (leaving Nisus Writer Pro behind)
2.1 does not add to iPad the Mac functionality where you can navigate your sheet by headings, so users will have to hope for that in future updates.
All the same, this is a worthy update. If you can live with .docx export replacing .rtf export, Ulysses users will want to update right away.
Find Ulysses for iPad here, for Mac here. I reviewed Ulysses in two parts here and here, where you can see more screenshots and read more about its features.
Ulysses offers a free trial of its Mac version here.
The post headline is directed to myself. (Though I’m glad to have just downloaded Mellel on the iPad, which I’ll be reviewing shortly–couldn’t quite help myself. No, really, maybe this will be the app that cures me of writer’s block!)
But seriously: a favorite procrastinating pastime of writers is checking out the latest and greatest writing apps. Not this guy, however:
I enjoy my writing medium more than ever before, now that I’m writing daily in Ulysses.
I started to review the app here; now I conclude my review of Ulysses for Mac.
3. Getting Text Out of Ulysses
You need to know a little bit about Markdown to fully utilize Ulysses. This is from their help manual, which takes the form of a series of interactive Sheets in the app:
“Ulysses uses so-called minimal markup to define, not format or style, text passages. The full list of available definitions is accessible via ⌘9, and it should have you covered left to right. From headlines to lists, to images and footnotes, you simply assign meaning to text passages by entering some easy to remember shortcuts.”
(P.S. I just used that keyboard shortcut and drop-down menu to make the above a block quote… or I could have just typed in “>” before the quotation.)
It’s taken me a little time to learn Markdown (though there’s really not that much to it), but once you have, you can take advantage of Ulysses’s export options.
Again, from the help files:
“Now for the fun part: Ulysses can output your writing to a host of standard formats, such as Plain Text, RTF, HTML, ePub and even PDF. It does so by translating your plain text input based on the definition of the minimal markup. If your brain starts to hurt, here’s a simple example…”
Markup in Ulysses
Here’s why I could write this two-part blog post series in Ulysses (using Markdown), export it to html in WordPress, and then have you read it now as if nothing ever happened: Ulysses “will translate the emphasized passage to semantically correct <em>, and the headline will be tagged with <h2>.”
The idea here is that once you know and use Markdown, you don’t really have to do much by way of thinking about formatting.
When you’re ready to export, you can click to bring up the window at right (or type the shortcut ⌘6):
From here you can preview, copy your text to clipboard, save it to a file, or open it with various apps. (I use Nisus Writer Pro to open my Ulysses sheet as a text file.) You can see your text as RTF, PDF, HTML, plain text, or even a nicely formatted ePub so you can publish your own ebook. Ulysses automatically converts your markup to its proper formatting in the finished product.
The Quick Export function is varied and rich enough, but it takes some fussing to get your text to look how you want it. (This fussing starts to defeat the purpose, in my opinion, of the supposed simplicity of using Markdown.) You can go to Preferences and add your own Styles, so can customize how your text exports, if you need more than just the default Styles Ulysses gives you.
Styles in Ulysses
But this is more effort than unaccustomed writers may appreciate having to make.
There is a Style Exchange where users post their own formatted style sheets, which you can download to your own Ulysses.
And if you do decide to go all in with Ulysses (I’m there), there is a reference guide you can work through to figure out how to make your own Styles to export just how you want.
(See also here for a succinct overview on Ulysses’s blog about exporting.)
4. Ulysses as a Writing Experience
I love writing in Ulysses. Required export efforts and occasional iCloud syncing frustrations notwithstanding, it is a beautiful app in which to put down and rearrange words. It’s smooth and visually appealing. And Ulysses really does accomplish the dual goal of the developers to be (a) distraction-free in its layout yet (b) still give you easy access to any feature a writer would need.
You can keep notes and goals aligned to a given Sheet (i.e., document), and view them from the Attachments pane, or detach them and see them as their own free-floating windows. This really enhances the experience of writing in Ulysses. You can also bookmark paragraphs and favorite Sheets, so navigating through stacks of writing is easier than you’d expect.
I’ve used Ulysses to help inspire me to finish a couple of mid-sized pieces of writing recently—pieces that I was interested in but lacking some motivation for at the time of having to produce them. I told myself I could use Ulysses to write, and the prospect of using that environment made a big difference!
I know this may be silly, but if you have some emails you need to compose that you have been putting off, writing them from Ulysses can be like a spoonful of sugar.
A Few Desiderata
There are a few things I’d like to see Ulysses offer in future updates, the lack of which have detracted (even if slightly) from my experience of using the app:
I would love there to be an easier way to adjust formatting in the Quick Export options (i.e., having something like the equivalent of a formatting toolbar which you can select for output, rather than having to do it through Styles). Also, I haven’t found a way to easily adjust image sizing (from Ulysses) when exporting a Sheet to a blog post–a process itself which could stand to be more fully automated.
The iPad app does not currently support the Navigation by headings feature I so appreciate in Mac. In fact, the same icon/button is present in iPad, but does something totally different.
Navigating by Headings
I do hasten to add, however, that the Ulysses for iPad app is stellar, easily one of the best apps in the App Store and my current favorite app for iPad.
It would be lovely if there were a way to include the word count as part of the Editor screen. It’s easy enough to find it in the Statistics or Goals portion of the Attachment pane (and both of these pop-ups can be torn off and left free-floating), but a simple word count bar at the top or bottom of the Editor would be nice. The iPad app does offer something along these lines.
I believe this is mostly the fault of the iPad’s lack of support for .rtf, but getting writing from Ulysses on iPad into a format that is .rtf-ready (not to mention .rtf itself) is just about impossible. If you can hop over to Ulysses on a computer, it’s doable, but iPad alone won’t really work for moving your content to rich text.
By the way, my love for Scrivener has not changed, and it’s still a fuller-featured environment for getting lots of research and snippets organized—and has its own really nice distraction-free writing mode.
But Ulysses is on iPad now, too (Scrivener: not yet, but close-ish), and it’s beautiful on the Mac, so when I’m doing long periods of writing, I primarily use Ulysses at as many points along the way as I can.
You can download a free demo trial of Ulysses for Mac here. More about the iPad app is here. Check it out, and play around with it for a bit. It’s helped me really rediscover my love of writing.
Thanks to The Soulmen Gbr, developers of Ulysses, for giving me a download for the review. See my other AppTastic Tuesday reviews (yes, this one is a few days early) here.
There are two things that seem to be all the rage in the world of writing and software: (1) Markdown and (2) “distraction-free” writing environments.
I’m more interested in the latter than in the former—I’m actively trying to root out distractions wherever they may be found. But Markdown is easy, everywhere, and seems a good way to explore learning other, more complex coding languages.
Ulysses offers both, and then some, with the goal of eliminating anything that takes the writer away from her or his craft of constructing words, sentences, and stories.
In fact, I’ve written and edited this post in Ulysses, then exported it as html into my WordPress blog.
In this review post and a second follow-up entry soon to follow, I write about:
Getting Text Into Ulysses
Ulysses as a Writing Environment
Getting Text Out of Ulysses
Ulysses as a Writing Experience
1. Getting Text Into Ulysses
Good writers need good tools, so a serious scribe will take time to track down a trustworthy tool, but one does want to be able to just open whatever program and start writing.
Getting to a new Sheet (Ulysses’s more-or-less equivalent of a document) is easy, even with no experience of the app, so one can just start writing in the default three-pane workspace:
The Editor is where the magic happens (i.e., you write the stuff). Using keyboard shortcuts or the menu bar, you can have one, two, or three panes visible. If you’re really hunkering down, you might not need to see your Sheet List, so can go to the Editor Only view.
However many panes you want to see at once (and Ulysses also allows multiple Windows open at once), starting to write in Ulysses is easy.
But what about importing text you’ve already got somewhere else?
Easy (mostly). You can copy-paste, even preserving formatting, or you can import a file wholesale by dragging it from a Finder window into the Ulysses sidebar, if it’s of the kind Ulysses will recognize. (My .zrtf Nisus Writer Pro tests did not work, but Ulysses did accept a sample .rtf file and even a Microsoft Word .docx file.)
2. Ulysses as a Writing Environment
So you can get writing right away in Ulysses, either from scratch or from pre-existing projects in (some) other formats. That’s a plus.
Writing in Ulysses itself has been a very positive—even a focusing and relaxing—experience. More on that in the next post. Ulysses as a writing environment requires some effort to learn.
For example, there’s the terminology (Sheets, Groups, Filters), though that’s pretty easy to pick up right away. And there’s the three-pane layout—though Mac Mail and other apps have prepped users for that. There’s also the lack of tie-in to the Mac Finder and files with file names.
That has taken some getting used to, but it’s not cumbersome by any means. In fact, Ulysses’s powerful search option (⌘-O) has meant I can always find anything I am looking for—quickly.
One nice touch in the app is that there are three Groups full of explanatory Sheets that tell you just about all you need to get started:
First Steps
Finer Details
Shortcuts And Other Tips
Here’s what they look like (in the easy-on-the-eyes Dark Mode with Dark Theme):
They’re like help files, only more fun and experiential.
Note also the fourth pane at far right, where I have added some Keywords (“I read this”—I have used that as a label to track my progress through the help Sheets) as well as a Note. Via this Attachments Bar you can also add an image or set a word count writing goal for yourself.
And the app can do some pretty sweet stuff. Here’s a sampling:
You can select a couple of Sheets and “glue them together” using ⌘J, which is good for putting chapters or sections together
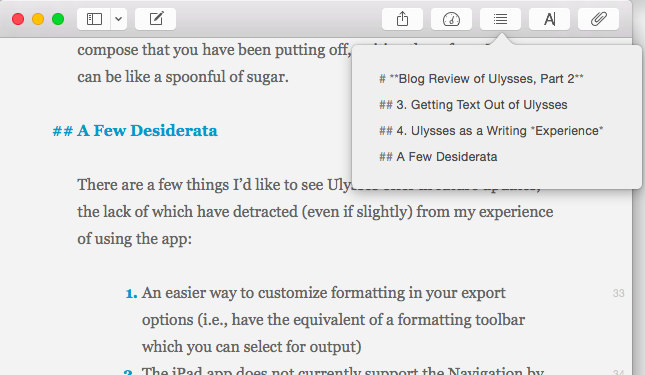
You can split a Sheet into two Sheets, which is what I’ve done with this blog post that started as one and now will be in two parts
From the Editor (the pane where you do the writing) you can go up and down your various Sheets using the ⌥⌘↓/↑ keyboard shortcuts
The Show Markup option (keyboard shortcut= ⌘-9) is really helpful, especially to folks like me who are new to Markup
Did I mention how easy on the eyes the Dark Theme/Dark Mode option is for nighttime writing?
You can make comments to yourself using Markup that will show in the Editor pane but won’t export when you’re ready to publish
The few things that at first seemed like limitations in Ulysses were, in fact, easy to pull off by selecting the right menu item.
I haven’t been able to find anything like navigation arrows in the toolbar—having these readily visible would easily allow one to move between Sheets and search results without having to have two app windows open at once, but there may be a solution I just haven’t found yet.
So far, though Ulysses has required some adjustment to my workflow, I’ve really been enjoying writing in it.
My Ulysses Statistics are telling me this post has exceeded 900 words, so I’ll write more next time about (3) Getting Text Out of Ulysses (i.e., export functions) and (4) Ulysses as a Writing Experience.
Thanks to The Soulmen Gbr, developers of Ulysses, for giving me a download for the review. See my other AppTastic Tuesday reviews here.