App Review: You Need a Budget

Image via YNAB


Long gone are my days of reconciling expenses in the check register to a print bank statement at the end of the month. Instead, I’ve been tracking daily expenses in real time since May 2015 with the app You Need a Budget (YNAB).

YNAB is a philosophy (with newly released accompanying book) as much as it is an app. Here are the four tenets of YNAB, in their words:

  1. Give every dollar a job.
  2. Embrace your true expenses.
  3. Roll with the punches.
  4. Age your money.

Their Website is as clean and clear and informative as any I’ve seen. You could easily (and productively!) get lost in their articles, tips, and sources of support for hours.

YNAB 4—which I received a few years ago for review and which has now been replaced by a yearly subscription model—consisted of a desktop app and mobile app that stayed in sync with each other via Dropbox. YNAB 4 is still fully functional, so you don’t have to upgrade to the subscription-as-service model if you don’t want to; you just can’t buy the stand-alone apps as a one-time purchase anymore. But what I’ve seen of the new Web app is an impressive step forward for an already great app.

The best thing about using YNAB is that even the act of tracking transactions has made me a more prudent spender. I’ve had months where I was still using an outdated budget, but tracking my spending was sufficient for not overdoing it. That’s perhaps the best contribution YNAB makes to one’s financial practice.

The four tenets are great, too. “Give every dollar a job” helps you avoid, as YNAB says, the scenario where you are feeling flush with cash after receiving a paycheck, so go out and buy all your friends drinks, only to realize 10 days later you needed that money for car repair. Their idea is that you decide what to do with your money before you spend it. It may not be novel, but it is also frequently ignored.

YNAB is a massive movement with a huge following. Using the app (and accompanying YNAB resources) these last 3.5 years has been immensely helpful.

Here are some pros and cons of the app (YNAB 4) itself:

PROS

  • Cross-platform integration means I can track an expense with the receipt still in my hand and everything stays current
  • You can carry the same budget over month to month with the click of a button, or easily modify as necessary
  • The support articles, forums, and Webinar options are some of the best of any app I’ve ever seen. In fact, in the middle of writing this blog post, I went to see what Webinars there were, found a 20-minute “Learn the Four Rules” session starting in a matter of minutes, signed up, and sat in on the 20-minute session
  • The app moves users away from the need to rely on complicated Excel spreadsheets (although I still use one for student loan tracking!)
  • Recurring expenses are super easy to set up; then you watch them populate into your register each month, with no need to manually repeat them
  • YNAB remembers your payees, so that I only have to start typing “Mar…” now to get “Market Basket” to pull up as an auto-complete option. It also learns what categories certain vendors fall into
  • Handling cash is easy—you have two options
  • There are some really nice spending graphs and charts you can pull up, to see where your money is going at a glance

CONS

  • I’ve occasionally had to reset my budget because sync didn’t pick up, although I’ve never lost data
  • Even though I’ve read and re-read the support articles on how to set up and manage credit cards in YNAB, I still find it less than intuitive

I typically include lots of screenshots in app reviews, but I’m not altogether sure how to do that in this case without disclosing sensitive info! There are a bunch of screenshots of YNAB 4 here, and of the newer subscription-based YNAB here.

All in all, working with YNAB principles has been a life-changing approach, at least in the area of finances. Check it out for yourself and see what you think.

A Thorough Review of Runkeeper (Go)


I may have been premature when I said Runtastic has the best running app on the market. Don’t get me wrong—it’s a great app, and I still use it regularly.

But Runkeeper—especially in its “Go” (premium) version—is a more versatile and aesthetically pleasing and powerful app.

In this review I’ll cover Runkeeper via these categories:

  1. Runkeeper on iPhone
  2. Training Plans (and Runkeeper Go)
  3. Personal Records and Goal Setting
  4. Runkeeper’s Web Interface
  5. Bells and Whistles
  6. What’s Missing
  7. Pay for Pro: Yes or No?


1. Runkeeper on iPhone


The most likely point of entry to the Runkeeper world is through the iOS App Store (or Android).

Although Runkeeper isn’t as economical with screen space as Runtastic is, Runkeeper looks great on a phone:


You’re definitely not going to miss any of your stats at a glance! A recent update made them nice and huge. You can also see a live map of where you’re going, provided you give Runkeeper permission to track your location when you’re using the app.

Once you’re finished with a workout, you can see a nice summary of your run:


With splits, too:


Each activity automatically saves the weather. You can add notes, track shoe mileage, and even tag a fellow Runkeeper user you might have run with:


You can add multiple photos of your run to an activity:


There’s even a setting to engage Runkeeper’s “Pocket Track” to automatically track your movement. You don’t even have to start an activity, for example, for it to track a walk:


It’s a little less immediate than in other running apps to get right away to your last activity–often the purpose for which I’m opening the app. You have to tap on the “Me” section, scroll down through a not-quite-optimized screen a bit, then tap on “Activities” to pull up the list.

The app also features a social component, so you can view friends’ activity. (This feature is much more robust than that of Runtastic.)
 

2. Training Plans (and Runkeeper Go)

 
The training plans in Runkeeper are awesome. I clicked on a “challenge” that popped up one day, and based on my previous runs, it smartly recommended my average 5K time, which would be a base for the training. Love it.


After working through the five interval-based runs, my sixth run in the ASICS Pace Academy Challenge did, in fact, have me showing some improvement.


The app also features audio coaching, which is especially useful in knowing when to adjust your pace on an interval run. The audio cues for interval runs are perfectly clear and well executed.

You can change the voice. I like Boston Fan, who invites me to the packie for a couple of beeahs after the run. Drill Instructor is pretty cool, too. You can adjust the volume and even how often your audio cue comes up—whether by distance (every mile or two or five) or duration (every x minutes). You can specify which stats it gives you, too—time, distance, average pace (the ones I use), split pace, even average and current heart rate (this works because I can link my Garmin with built-in HR monitor to the app!).

You can set up your own intervals and training plans, based on a goal time. Some of these plans are available without the premium Runkeeper Go; others require the subscription.


And you can even get a weather report showing atop your training plan!


Runkeeper Go also adds the ability to compare workouts. I could hardly believe a little iPhone app could do this, but you can select two different runs, for example, and see how they compare at various points.


Go also gives you “progress insights,” so you can quickly see (in chart form) your average pace over time, mileage per month, and even track weight over time.
 

3. Personal Records and Goal Setting

 
Runkeeper does a nice job of keeping track of all your personal records in one place. And where you haven’t achieved a personal best (for a half marathon, say), you can tap on training plan options.


The opening screen on the iPhone app also has a row with your records showing.


New records show up right away, if you beat them:


And you get an email!


One huge lack is that if you beat your 5K time but then run another kilometer, your run won’t count as a 5K.

There was one run where I got a new fastest 5K, which showed up as a badge in the activity:


But you’ll see it says my “Fastest 5K” is 27:29 under the badge, whereas that was the time for that activity, which was 3.2 miles. The 5K itself (at an 8:35 pace) would have been more like 26:42.

Oddly, it still does register properly as my fastest 5K pace, as seen in the comparison screen here:


What I really want to see is how long the first 3.1 miles/5K of this activity was (duration), showing under my record badge wherever it appears, so I know what my fastest 5K time actually is. Support told me I can edit the map and delete the overage, but that feels like more work than I should have to do to track a fastest time.

The app also supports goal setting, including exercising a certain number of times a week, losing a certain number of pounds by a certain date, and more. I use this feature regularly.
 

4. Runkeeper’s Web Interface

 
With Runkeeper (unlike Runtastic) you can bulk export your data, so that the app does not hold your running info hostage, so to speak. I love this about the app. You can export individual activities and a whole date range–right to a spreadsheet, if you want to make your own platform-agnostic running log.

You can access your feed (also available on the phone)…


… as well as all your activities:


Your Web dashboard is basically your own feed that includes activity, personal records, and goal progress.

You can also use the site to manually log a run and access any routes you’ve saved.
 

5. Bells and Whistles

 
Here is a sampling of additional features available in Runkeeper:

  • you can see your average pace for this week vs. last week (or this month vs. last month) in the “Me” part of the app–same with total miles. I use this often
  • you can track indoor runs with “Stopwatch Mode
  • there’s the ability to share to social media with run stats and photo (see here)
  • you can track mileage for a pair of shoes
  • you can tag your runs. The longer I use Runkeeper, the more I make use of this feature. The tags are pre-selected (you can’t make your own), but you can tag long runs, speed runs, races, etc. And then you can filter activities by run type. Sadly, and for some odd reason, you can’t see these tags on the Web site
  • activity splits are easy to see, whether per mile, or per predetermined interval


6. What’s Missing

 
You can’t see an activity’s weather details in Web view, even though it shows on the iPhone app. (Runtastic has it in both places, and I’d expect more features, not fewer, on a Website.)

There is no iPhone Today widget, which would be a cool addition, even if only to see total miles for the week or month.

The app is a data hog. In this image, I was using Runtastic to track my 8-mile run, and only opened Runkeeper at the end so it could pull in data from my Garmin and sync the run. Runkeeper used far more data than Runtastic to accomplish far less.


If you turn data off for the app (I do), you’ll see this message after your run, each and every time, until you reach Internet:


It’s not the end of the world, but if you’re on a limited data plan, turn data off for the app. The GPS can still track you and make everything work as needed.
 

7. Pay for Pro: Yes or No?

 
For most users, the free version of Runkeeper will do just fine. But if you’re trying to up your game with in-app training plans and want the added metrics of run comparison and progress “insights,” Go is well worth exploring. All the features are listed here:


Details at this link.

All in all, Runkeeper is not a perfect app and doesn’t do everything I’d wanted, but it looks great, works well, has powerful options, and is (from what I can tell) the best running app on the market. I’ve been using Runtastic and Runkeeper in tandem—import/export options make it not that cumbersome to track runs in both places. But if you’re just starting running and want to try an app, go for Runkeeper, and see what you think.


Thanks so much to the folks at Runkeeper who set me up with a trial of Premium so I could review the app! Check it out here.

Exercise App Review: Runtastic

Runtastic has probably the best running app on the market.

And there’s no shortage–Strava, MapMyRun, Endomondo, Runkeeper, etc.

I’ve been using Runtastic for a couple years now–first on an iPhone 5C and now an iPhone SE. Runtastic is cross-platform: it has an Android app, as well as a Web interface you can access from any Internet-connected device.


Runtastic: the iPhone App


Even if the user interface doesn’t look “native” to the iOS world, the layout is clean, intuitive, and easy to read at a glance.

Here’s what it looks like mid-run:


GPS is great


You may notice that screen says “Internet not reachable.” That’s because I have a highly limited data plan, so I use the app with my data off. Still, the GPS tracking works remarkably well, even without Internet or cell data. This is impressive.

The app updates everything in real time–your map, your current pace, your average pace, your distance, and your duration. The Premium version of the app (more on that later) also has auto-pause, which detects when you’ve stopped running and automatically puts tracking on hold. (Not every running app has this.)

Here’s what it looks like when you’re done:


Results Screen.png


Again–everything is really easy to see at a glance. You can even see your spits:


Splits.png


And–what’s amazing to me–drag your finger across the line to see what your pace was at any given moment in your workout:


Splits drag.jpg


You can even customize how your splits occur–whether miles or minutes:


Splits customize.jpg


Splits customize 2.jpg


The history screen (easily accessible when you open the app) looks great:


IMG_9937.png


And you can compare statistics (by week, month, or year). I find this motivating:


IMG_9938.png


There’s more–you can track how many miles you’ve run in a given running shoe:


Screenshot 2017-04-10 23.16.25.png


Which also permits a more detailed view:


IMG_9942.png


The voice coach is even customizable, and gives you audio markers for different points in your run:


IMG_9945.png


Setting Records


Runtastic does a great job tracking your personal records, and letting you know when you’ve beaten them. One lack is that a personal record does not pop up automatically within the app once you’ve gotten it in a given activity. You have to wait to check the Website or receive an email (automatically generated). Record notifications look like this:


Records.png


Record Pace.jpg


I loved getting this email!


Email.png


The Web Interface


It’s not perfect, but it shows you a ton of information. The home screen looks a little cluttered to me:


Screenshot 2017-04-10 10.24.42.png


Even with Runtastic Premium, which removes ads, I have an item on the top and everything in the right sidebar that just look like, well… ads. They’re all in-house, but I could do with less. You also still get pop-ups (rarely, but more than expected) like this on the phone:


UNADJUSTEDNONRAW_thumb_3616.jpg


You can set everything to private, though, so no one knows when, where, or how fast you’re running, except you.

This activity view on the site is much cleaner (minus the vexing “Report a Problem” pop-over that I can’t close out):


Screenshot 2017-04-10 10.27.22.png


The site allows you to see some cool stats, too. I loved knowing (and was grateful Runtastic tracked it) when I most often work out!

You can also easily import a workout (either a GPC or TCX file) from another app. This process is pretty easy and smooth. You can export a single workout from Runtastic elsewhere, but there is no bulk export option. If you do a bunch of workouts in Runtastic, it’s not so easy to later migrate all that data elsewhere. Other apps are proprietary like this (some accuse this kind of thing as a sort of “holding your data hostage”), although Runkeeper allows you to bulk export your data. Runtastic should add this feature.

You can also have a weekly fitness report delivered your way, which is cool:


Email Running Report.png


Running Goals


There’s a lot more I could mention, as this is a really great app. You can set yourself a duration and distance goal and track your progress in real time. This has made a couple of my runs better! Here I am meeting my pace goal:


IMG_9740.png


But then I fall behind:


IMG_9741.png


I didn’t make it that time:


IMG_9743.png


The next time, however….


IMG_9760.png


To Premium or Not to Premium?


Easy. Premium. You get ads removed (except for in-house stuff that I’d like also to be able to remove), free training plans, free “story runs,” the aforementioned records tracking, a free 3-month trial to Runner’s World, accelerated response to support queries, and more. (Details here.) It’s a subscription model, so you just have to decide whether you’d use the premium features. The price is definitely reasonable for what you get in return.

I’ll have a Runkeeper review posting soon, so will be able to better compare, but from what I’ve seen so far, Runtastic (especially in its Premium version) is the best running app I’ve seen. Check it out here.


Thanks so much to the folks at Runtastic who set me up with a trial of Premium so I could review the app!

Coming Soon to iOS: Scrivener

Scrivener Logo


The full-featured writing app for Mac and Windows is at last on its way to iOS, soon to enter beta testing.

Here are some interesting details from the developer:

  • Scrivener for iOS will run on most iOS devices – the only requirement is that it can run iOS 9 and above.
  • It runs on iPhones as well as iPads (although certain features that require more space—such as the corkboard—are iPad-only).
  • It supports the multi-tasking features of the iPad Pro.
  • Scrivener for iOS will not support iCloud (at least for now) – syncing will be done via Dropbox. I’ll write a post explaining why soon. (You’ll be able to leave your desktop project open while you’re off using it on your mobile device, though.)

More details here.

OmniOutliner for Mac and iOS, Reviewed

OmniOutliner-for-Mac-1024The rise of the brilliant app 2Do notwithstanding, I continue to utilize OmniFocus as my task management hub. I was eager, then, to try out The Omni Group’s outlining app, OmniOutliner.

Think of OmniOutliner as a thought structuring app, suitable for both creating and organizing content. You can use it for any of the following scenarios:

  • making a grocery list
  • taking notes in class
  • writing a paper (and re-arranging sections easily)
  • planning and following through with a project
  • tracking and categorizing expenses
  • writing and editing your podcast script

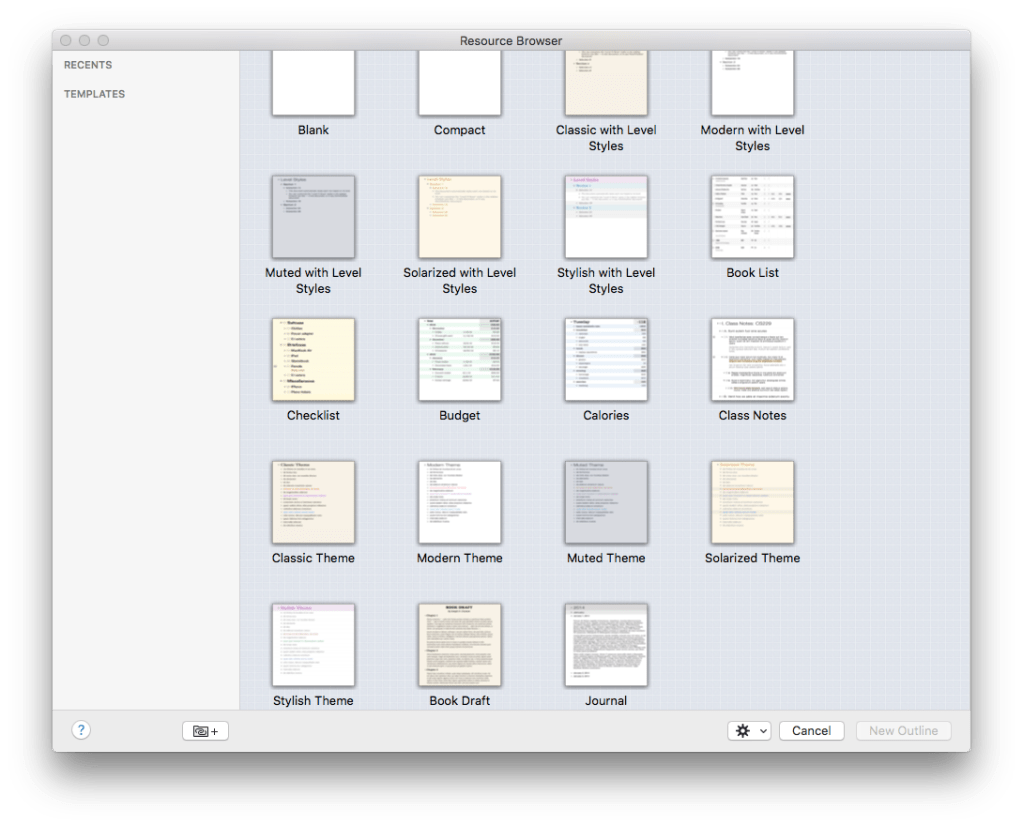
There are multiple other uses for the app–I’ve made good use of it in sermon preparation, as you’ll see below. Right away the Mac and iOS apps take you to a templates screen so you can get started without delay:


Templates
On this and all images in the post, click or tap to enlarge


What’s Awesome About OmniOutliner


Getting content into OmniOutliner is fairly easy. It’s not as intuitive as just opening a blank Word document and typing, but it’s simple enough to open an outline and start writing.

Once you’ve gotten your outline going, being able to fold and unfold (collapse and expand) entire parts of the outline is a huge asset. If I’ve broken a book review down into parts, for example, I can just collapse the sections I don’t want to see at the moment:


Book Reviews Two Columns


Then there is the organizing power of OmniOutliner: you can take any node and indent or outdent it. You can drag sections of the outline around to quickly re-order them. And you can make batch edits when selecting multiple parts of your outline.

Perhaps the most helpful feature to me has been the ability to add notes to content, which you can then either hide or show. In this simple outline, I’ve set the note at the top to display (in grey), while the one toward the bottom remains hidden.


OmniOutliner Simple


You can show the sidebar, which allows you to move back and forth between a lot of content in one outline. When preaching on David’s odious sin against Bathsheba and her husband, I utilized an outline that included both my sermon structure and accompanying research. You can see that reflected in the sidebar, at left, even while my Topic column could remain focused on a smaller portion.


Outline in OmniOutliner


You can add media (audio recordings and video) to your outline. Your files would be huge, but if you wanted to use OmniOutliner for classroom notes, you could also add a live recording of the session, straight into your outline.

And then there is the styling. My goodness. You can tweak every aspect imaginable of your outline.

OmniOutliner Style PaneI found this feature set to be impressive but overwhelming. For my purposes, I didn’t need to do a whole lot by way of formatting, but the options are there should you need them.

To that end, the help files for OmniOutliner are incredible. So is their support team! There are user manuals you can download in multiple formats, and they are outstanding. In a couple of sittings, I read some 100 pages of the iBook version of the OmniOutliner for iOS manual. Yes, it was that interesting! Other app developers should take notes.

OmniOutliner is also available as a universal iOS app, working on both iPhone and iPad. You can sync across devices using Omni’s own server or your own.

The keyboard shortcuts available for iPad make OmniOutliner a serious contender for best writing app for those who are trying to make a serious go of it on iPad instead of computer. Omni Group’s Ken Case announced the shortcuts last November.

This means that the iOS OmniOutliner app is close to parity with the Mac app. This rarely seems to be the case with other apps, where iOS versions tend to lag behind their desktop counterparts.

OmniOutliner has had Split View and Slide Over in iOS for just about as long as iOS 9 has been released.

One other really cool thing: you can import the OPML file format from a mind map to move from mind mapping straight into OmniOutliner.


MN and OO with note


If that workflow interests you, read more about it here.
 

What’s Lacking


A few things are lacking in OmniOutliner:

  • I’ve experienced a couple of crashes when exporting my outline to other formats
  • The precision and plethora of styling options makes the app feel wooden and clunky at times, especially when you want to just sit down and write
  • If I want constant access to, say, a section of text in the second half of my outline, while I work on the first half, there is no way to split the screen or freeze a section so I can see easily disparate parts of my outline at once
  • There is no word count feature (!). Omni has indicated this could come in 2016, but not having it has kept me from making OmniOutliner my go-to writing app
     
    (Note: if you have OmniOutliner Pro for Mac (twice the price of the regular OO), you can go to the forums for an AppleScript that will help you with word count, but this is more than the average user should be expected to do.)


More Info


Byte for byte, OmniOutliner is worth your considering as your primary writing app. If you don’t need to be as structured with your writing, it may not be your top choice. Its integration across iOS and OS X, though, make it a possible go-to repository for collecting and organizing information.

You can find out more about OmniOutliner here and here.

OmniOutliner for iOS (Universal) is $29.99.

OmniOutliner for OS X is $49.99. OmniOutliner Pro includes a few more features and is $99.99.

You can get a free trial of Mac app here.


Thanks to the fine folks at The Omni Group, the makers of OmniOutliner, for giving me downloads for the Mac (OmniOutliner Pro) and iOS apps for this review. See my other AppTastic Tuesday reviews here.

Review: HEX Century Icon Folio for iPad Air 2

Last month I reviewed an iPad Air 2 case from KAVAJ and said:

As with iPad Mini cases, there are a lot on the market–so many that one could easily get lost in the three-hour rabbit hole of trying to find just the right one.

I’m not sure I have found just the right one for the iPad Air 2. There are a couple that are close–I’ll share about those in due course.

One of the cases that is close to being just right is the Century Icon Folio for iPad Air 2, from HEX Products.


What I Like About the Icon Folio


It’s not all leather, but the external material is primarily waxed canvas of high quality. The casing around the iPad itself is hard rubber. The HEX case strikes a neat balance of professional, classy, and casual.


Front


Back


The cut-outs for volume buttons, headphone jack, and camera are 100% A++.


Hole Cut-Outs


It’s a slim case, which makes it a good one for pulling in and out of a satchel a lot. It doesn’t add any bulk to the iPad.

You’ll have seen in the images above the elastic strap–you can use this to secure the bi-fold case, so that it doesn’t inadvertently open in your bag. The strap is thick and has the perfect amount of tension.

A key feature of the folio is the inside compartment where you can put three cards, cash, and a few notes, as you like:


Left Inside Card Slots


You can squeeze enough in here that you could take literally just this case and its contents to your favorite working spot (if you didn’t need an external keyboard).


Open


What I Don’t Like About the Icon Folio


Just two minor critiques to offer:

1. There’s no mechanism whereby you can make the case stand or prop up. In other words, the front of the case doesn’t fold as other cases do, for when you want to sit your device on a table and watch something or use an external keyboard with it.

2. After only a little use, part of the (faux?) leather strip on the side was starting to separate from the hard rubber. Nothing major, but one does hope this doesn’t worsen with time, especially given that this is not an off-brand, $20 option.


Bonus Feature, and Where to Get It


Bonus feature: though I haven’t seen HEX advertise it anywhere for this case, it does have a sleep/wake feature, so that when you close the case with the iPad on, it puts the screen to sleep automatically to save battery. This functions as it should consistently.

You can learn more about the HEX case at their Website here. And it’s available on Amazon here.


The kind folks at HEX provided me the case for the review, without expectation as to my review’s content.

Review: KAVAJ iPad Air 2 Leather Case


Image via KAVAJ (all others my own)


If I’m not mistaken, this is the first iPad Air 2 case I’ve reviewed at Words on the Word. As with iPad Mini cases, there are a lot on the market–so many that one could easily get lost in the three-hour rabbit hole of trying to find just the right one.

I’m not sure I have found just the right one for the iPad Air 2. There are a couple that are close–I’ll share about those in due course.

In this post I review the KAVAJ iPad Air 2 “Hamburg” leather case in cognac/brown.


What’s Great About the KAVAJ Case


This is an ephemeral satisfaction, but the packaging in which KAVAJ sent the case was as classy as the case itself:


2_Packaging


I really like the leather look and feel (and, of course, smell) of the case. (Current WordPress technology does not yet permit me to upload the smell to the blog.)

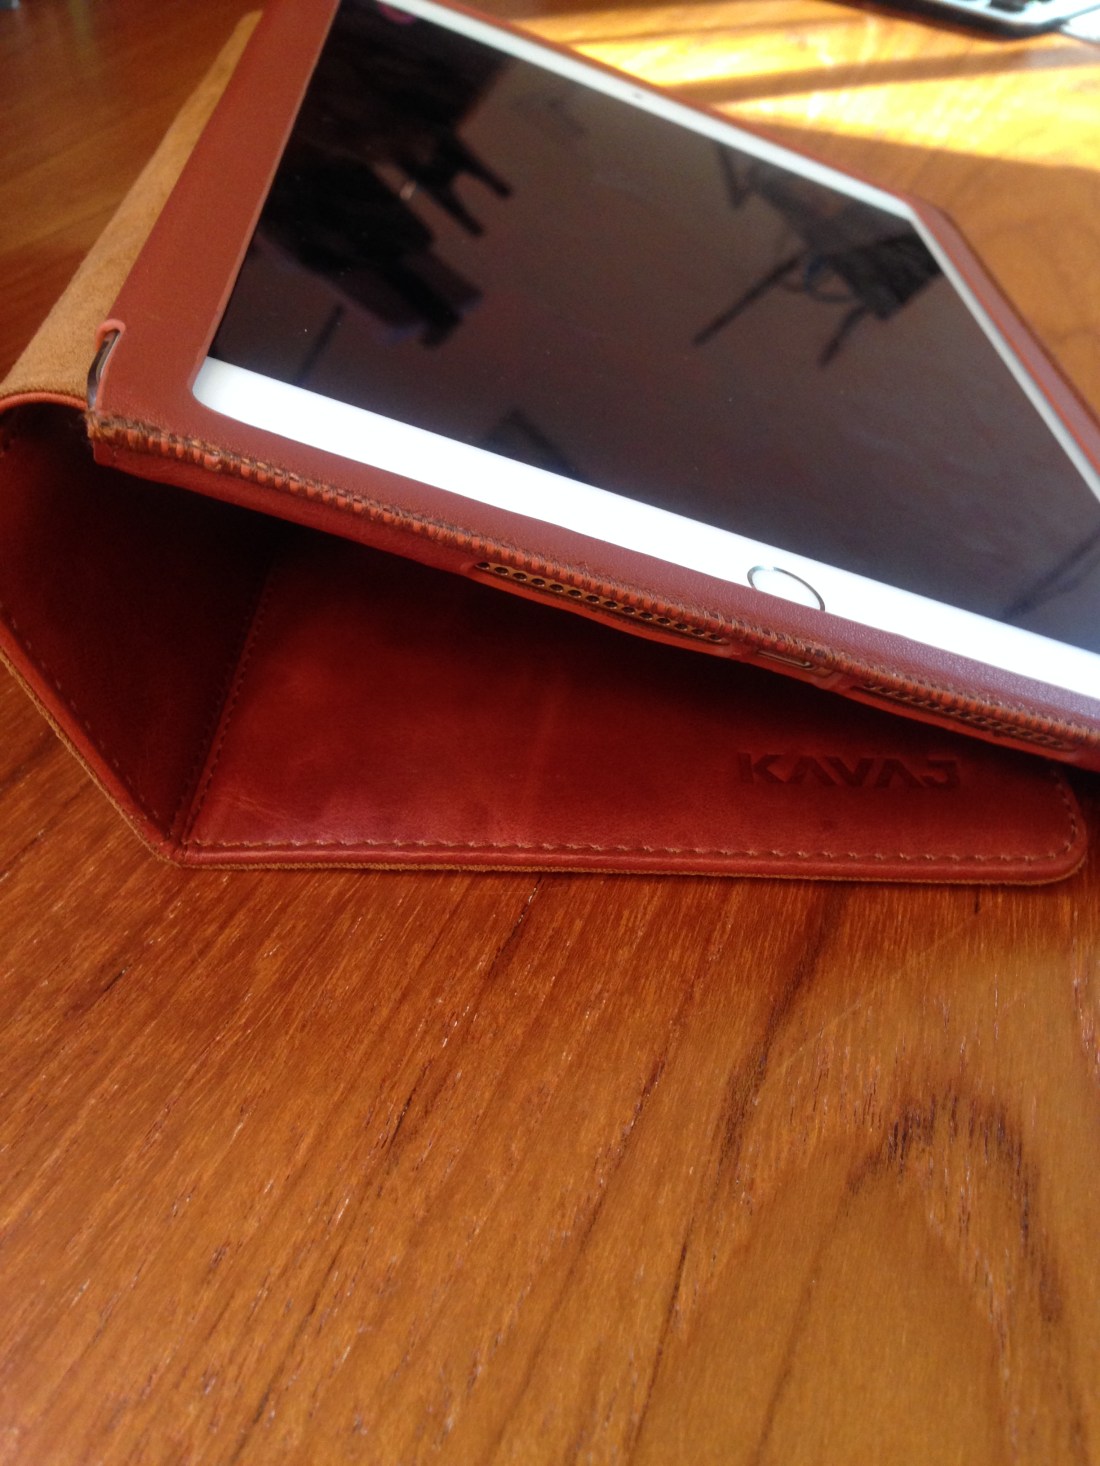
The stand system is secure and allows you to put the iPad at just about any angle you want. This is the best part about the case, as some others give you just two options, neither of which is quite the right angle. Here are some of the ways you can angle your iPad in the case:


1_Side View


1_Case at Other Angle


There’s also room to set up an iPhone there, in case you want to toggle between iOS devices. That’s a nice bonus.

The case is light–when folded back and reading in portrait mode, it actually makes the device easier and more enjoyable to hold than on its own. Cases that combine usability in both keyboard/orientation mode and reading/portrait mode seem to be rare.

The stitching is good, too. It looks like it’s not coming loose any time soon. And the inside flannel is nice and soft–no worries about it scratching your screen.


What’s Not-So-Great About the KAVAJ Case


There is an auto sleep/wake feature with the magnetic closure, which is good, but it’s really hard to get at the sleep/wake button itself when the case completely covers it. What if you want to leave your iPad set up on the stand all morning and turn it off when you’re not using it? When the iPad is in the KAVAJ case, it is very hard, if not impossible, to do.

This next assessment may be picky on my part, but I think anyone looking for a good case for an iPad Air 2 is warranted in that: the casing is not 100% centered when placed around the iPad.

It covers the home button just a tad, so that any time you go to press the home button, you’re competing the case. This is not an insignificant hassle, especially considering the use of Touch ID.

Here are some images showing what I mean:


2_Open with iPad in


1_Close-Up Home Button


Also, the snugness and slight off-centeredness of the case makes sliding in or up from the edges of the screen almost impossible. I’m not sure how else they could have circumvented this with this kind of case, but it feels like a design flaw, or at least something that leads to unusability.

That said, leather stretches out over time. A good week in the case didn’t make a difference on this front, but maybe it would improve over a longer period of time.

Finally, the case leaves just a little bit of exposure to the edges of the iPad. This may be necessary for the slide-in feature to work, but it leaves iPad exposed at a couple key spots–you’re likely to get a dent if you drop it. (And the leather isn’t all that protective anyway–a trade-off for the aesthetic.)

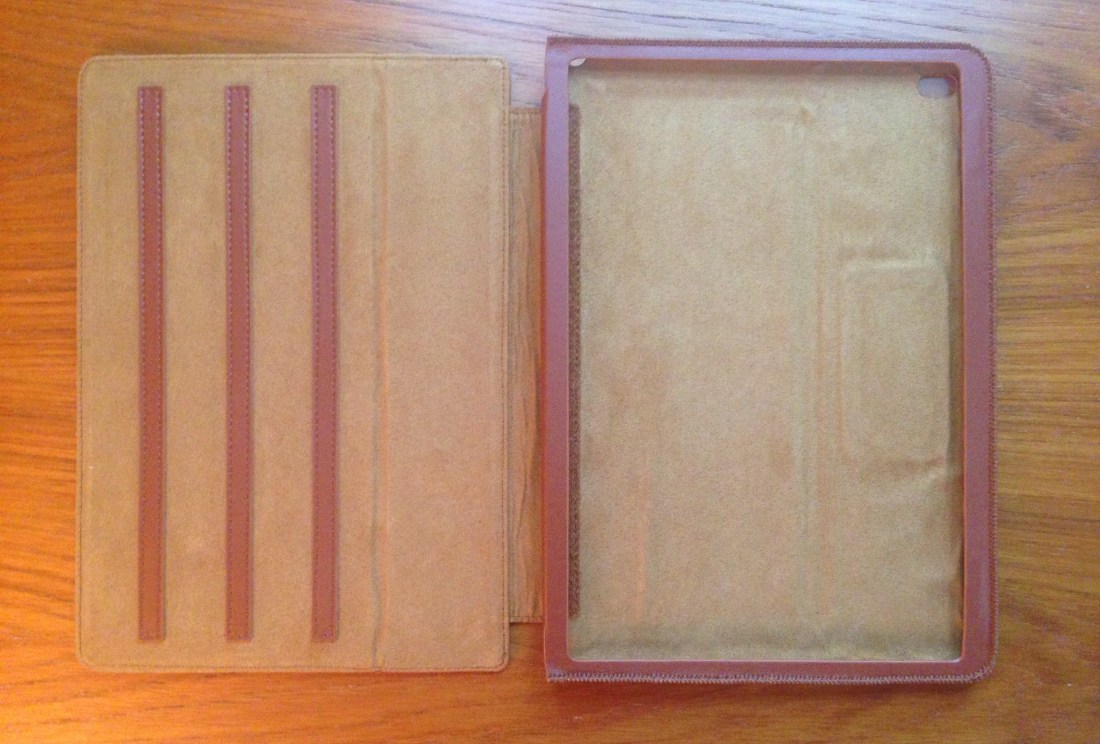
Where to Get It


2_Open and Empty


You can learn more about the KAVAJ case at their Website here. And it’s available on Amazon here.


KAVAJ provided me the case for the review, without expectation as to my review’s content.

Alto’s Adventure, Reviewed (and Currently $0.99)

I don’t know what your New Year’s Resolutions are, but if one of them is to play more video games (uh…), you should start with Alto’s Adventure.

Four traits especially stand out that make the game enjoyable:

    1. The graphics are gorgeous.
    2. The music is excellent–it evokes the old Final Fantasy scores, but sounds more like 2015.
    3. Playing it is really relaxing.
    4. Being a flipping snowboarder (especially if you can’t do it in real life) is fun.

It’s what reviewers call an “endless runner” game, which means you could go a gazillion meters on your run with Alto, which of course you never will, since you’ll hit a rock or get knocked down by an elder or fall into a ravine or ____ first.

But that won’t keep you from tapping “Play Again” multiple times.

The main stat to go for is “distance travelled.” But you can boost your trick store through a series of bunting grinds, flips, and the like. There are coins to collect (with magnets to help!), llamas to chase, and chasms to jump.

Here’s the score screen (for all images in this post, click to enlarge):


Score Screen


And a couple looks at the game:


Paz Daytime


The background changes from sunny and clear to dark and rainy, which adds a level of challenge (and fun) to the gameplay:


Raining at Night


In the Air


In the Air 2


If you accomplish three goals (smash three rocks, land two triple flips in one run, and so on), you move up a level. Move up enough levels and you unlock new characters:


New Player Paz


You can use your coins to buy workshop items:


Workshop Items


The gameplay is smooth and responsive. (Though flying with the wingsuit is tricky.) You only have to tap to jump, so the controls are easy enough to learn, but staying up for a long run is no easy feat.

Alto’s Adventure is currently $0.99 (on sale) at the App Store. It’s easily one of the best games for iOS.


Thanks to the makers of Alto’s Adventure for the review copy of the app, given to me for this review but with no expectation as to its content.

1Writer: The Best Text Editor (and Blogging App!) for iOS

1Writer Icon


1Writer has been living in both my iPhone and iPad docks for a number of months now. It’s high time I wrote a proper review! It’s easily my favorite text editing app for iOS.


About 1Writer


Here’s a paragraph description of the app from the 1Writer site:

1Writer provides a distraction free writing environment. You can create and edit plain text or Markdown files. It does have many features including inline Markdown preview, word count, dark theme, TextExpander support, insert photo, an extra keyboard row, and many more. The extra keyboard row is a convenient row of buttons for navigation, formatting, special characters and actions. See the formatted results with inline Markdown preview while you write and a full, rich-text preview when you’re done.

My favorite feature is its ability to insert images right from an iOS device, making it the first iOS app I’ve found that is actually suitable for blogging.


1Writer: The Pros


Sync

Whether you want to use Dropbox or iCloud, 1Writer has excellent syncing capabilities. I have a couple Dropbox folders I sync to 1Writer, which is now where I keep blog post drafts. I can update a document from iPhone or iPad–or even use a Mac to update a draft with an OS X Markdown app.


Images!!!

You can blog from 1Writer. It has been surprisingly difficult to find an iOS app that can do this well, including WordPress’s native blogging app. One downside is that you can’t resize the images once you insert them into the post, so it’s still not as flexible as blogging with images through the WordPress Web interface on OS X. The fastidious among us may want to double-check layout in WordPress itself before posting anyway, so this is not a deal-breaker, if not ideal.


Works Great with an External Keyboard

You can type CMD-B for bold and CMD-I for italics, and it both inserts the markdown markup and shows you the inline preview. Not even Editorial can do this. You can also insert links with a keyboard shortcut.


Built-in Web Browser

Because 1Writer has a built in Web browser, you can search for images without even leaving the app, and then insert them into your document. There is also a really nice hyperlinking functionality, and you don’t have to leave 1Writer to find a link you want to include in a document or Web post. One especially nice touch is once you’ve got a link copied, the hyperlink button gives you the pop-up option of just pasting the clipboard contents (your link), so you can save a tap there.


Built-in Web Browser


Great-Looking Interface

The interface is easy to look at for a long time when writing:


1Writer Text


Tagging System

1Writer has a built-in tagging system, so you can even more easily organize your documents.


Tags 1


Tags 2


Actions

Like Drafts 4, 1Writer has a number of actions you can perform on your text. Whether you want to use a pre-installed action to export your document as plain text or PDF, or install something from the 1Writer action directory, there’s not much missing here.


Actions


My personal favorite action is “Jump to Section,” which allows you to navigate by headings. This is especially useful for long documents where you quickly want to go between sections. The interface of this feature is not quite as smooth as Editorial’s similar function, but it still gets the job done.


iOS9-Ready

Speaking of Editorial… that’s a fine app, but it’s still not iOS9-ready. 1Writer is, so you can utilize Slide Over and Split View functions.


Customizable Keyboard Row

There’s an extra, customizable keyboard row–including the ability to assign a character or even action to a button.


Top-Notch Developer

The developer is amazingly responsive. He totally knows what he’s doing, and has built an excellent app already. Insofar as there are small, desired improvements, he takes feedback seriously.


1Writer: Just a Few Minor Drawbacks


The built-in Web browser does not allow for multi-tabbed browsing. I found this to be a limitation, though since iOS9, when I want to search the Web, I tend to do it via Safari in Split View with 1Writer open separately anyway.

Another drawback: you can’t sync actions between devices. You have to manually set this up in any iOS device you use. Documents themselves sync perfectly, of course, just not these custom actions.


Concluding Evaluation


There are people who swear by Drafts (I am one!) and Editorial (there’s a lot to like about that app). But 1Writer is exceedingly underrated. (Though that may change now that Viticci reviewed it!) If you’re a blogger, especially, this is the app that will finally allow you to blog from your iOS device.

It’s (no question) the best thing on iOS for bloggers. And maybe even the best note-taking app, too.

You can find it in the App Store here. And, yes, I did write much of this post in 1Writer, exported the Markdown to HTML (from 1Writer), and then published.


Thanks to 1Writer for the review copy of the app, given to me for this review but with no expectation as to its content.