Agile Tortoise (Greg Pierce) is probably the best iOS developer there is. I use his Drafts 4 app all the time–an amazing combination of text editor simplicity and power user export options.
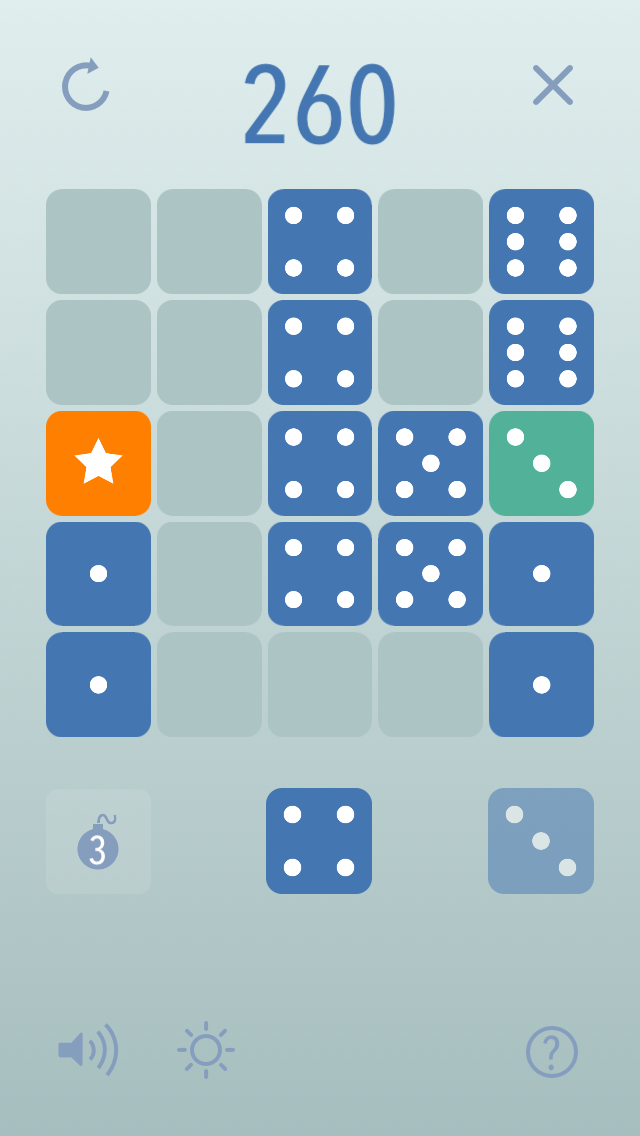
Diced is a simple puzzle game. Place dice on a grid to make five of a kind or five in a row (straight) combinations to score points and clear the die. Score as many points as you can before the grid fills up and the game ends. Some game play features:
Quick launch and game restore. Easy to leave and come back where you left off.
Wild die.
Bombs.
Random blocks to add difficulty as the game progresses.
Game Center support with leaderboards and achievements
There are no ads, no in-app purchases, and it works perfectly. It’s universal, so you can play on iPhone and iPad, where Split View is also supported. (This guy thinks of everything.)
It’s not quite like poker–a full house combination won’t clear a row for you. But between the five of a kind and five straight goals, you’ve got enough ways to clear the board (the bombs help, too). Also cool is the dark mode, which you can toggle off and on.
I don’t know what your New Year’s Resolutions are, but if one of them is to play more video games (uh…), you should start with Alto’s Adventure.
Four traits especially stand out that make the game enjoyable:
1. The graphics are gorgeous.
2. The music is excellent–it evokes the old Final Fantasy scores, but sounds more like 2015.
3. Playing it is really relaxing.
4. Being a flipping snowboarder (especially if you can’t do it in real life) is fun.
It’s what reviewers call an “endless runner” game, which means you could go a gazillion meters on your run with Alto, which of course you never will, since you’ll hit a rock or get knocked down by an elder or fall into a ravine or ____ first.
But that won’t keep you from tapping “Play Again” multiple times.
The main stat to go for is “distance travelled.” But you can boost your trick store through a series of bunting grinds, flips, and the like. There are coins to collect (with magnets to help!), llamas to chase, and chasms to jump.
Here’s the score screen (for all images in this post, click to enlarge):
And a couple looks at the game:
The background changes from sunny and clear to dark and rainy, which adds a level of challenge (and fun) to the gameplay:
If you accomplish three goals (smash three rocks, land two triple flips in one run, and so on), you move up a level. Move up enough levels and you unlock new characters:
You can use your coins to buy workshop items:
The gameplay is smooth and responsive. (Though flying with the wingsuit is tricky.) You only have to tap to jump, so the controls are easy enough to learn, but staying up for a long run is no easy feat.
Alto’s Adventure is currently $0.99 (on sale) at the App Store. It’s easily one of the best games for iOS.
Thanks to the makers of Alto’s Adventure for the review copy of the app, given to me for this review but with no expectation as to its content.
Prune is a really fun and enjoyably challenging game for iOS.
It’s got a simple, minimalist, beautiful design. David Sparks of MacSparky even used a screenshot from the game for his iPad lock screen!
You start with a screen like this:
Then you swipe up to start your tree growing.
You can pinch to zoom to get a closer look, which you will need as your tree grows in multiple directions. When it is time to prune the tree, which you do to get it to grow toward the light, just swipe your finger across the branch you wish to cut, and it will fall off.
You beat a level by pruning to create the predetermined amount of blossoms on your tree.
The graphics, music, and sound effects are all beautiful and relaxing.
You will want to avoid things like red suns, or your beloved tree burns up:
Not like this
But like this
Once you spend the $3.99 on the app, there are no further in-app purchases or ads.
One might be forgiven for wondering how engaging an app with this premise can be, but it really is fun to play. Apart from its gorgeous design and responsive controls, users will quickly find they are eager to make progress through the game’s various levels. Prune came recommended, and it’s been even better than expected.
If I could have the sync of Things, the layout and tagging and look of 2Do, the simplicity of Todoist, and the power and custom perspectives of OmniFocus, I’d have my perfect task management app. And I’D BE A PRODUCTIVITY MACHINE. Well, no, I’d still have to do all the tasks. (And life is more than doing stuff, anyway.)
But the answer to the question in the header above is that each task management app I’ve tried does not quite fit all my preferences. We adjust, of course, and it’s this phenomenon that has coders writing new task management apps as we speak. Maybe I’m just picky, though I’m far from the only one.
That’s all preface to why you are reading yet another task management app review on this blog. Here I consider 2Do.
Where 2Do (IMHO) Falls Short
Allow me to get the critiques out of the way first, because I really do like this app–a lot. And it has the most aesthetically pleasing interface out of any task management app I’ve used (OmniFocus, Things, Todoist…). But there are a few things that I would hope could be improved.
1. Sync is good (via Dropbox), but not quite instantaneous.
A recent release offered some significant improvement in sync speed, i.e., push sync. (2Do syncs via Dropbox, iCloud, Toodledo, or your CalDAV server.) Tasks and changes don’t sync instantaneously across devices (like Apple’s Reminders do), but this is more due to Apple’s limitations on third-party apps than any shortfall on 2Do’s part. Still, it’s a minor hassle when using the app. Things keeps leading the way here. More on 2Do’s sync methods is here.
TL;DR: Cross-device syncing with 2Do is about as good as it gets, but not perfect.
2. You can’t really email a task in to the app, per se.
There are workarounds, but there is no easy and direct way to convert or forward emails to tasks from wherever you are. This, in my view, is a key necessity of a good task management app. Outlook, OmniFocus, Todoist, and Evernote all allow this, for example.
You can convert a Mac Mail message right to a 2Do task, however, described here, and that may be all some users need. There’s also a workaround using Toodledo that allows you to email tasks to 2Do, but non-users of Toodledo would have to create a new account and learn a new app to be able to do that. (It will be enough to learn 2Do.) For iOS email-to-task conversion, folks might consider the Dispatch app. But here’s to hoping 2Do adds support for email-to-task automation in a future release–one of the few things missing in this slick app.
That I have no additional major critiques than these is actually significant, since I’m a little picky when it comes to this kind of app. And now, on to the good stuff…
Ways in Which 2Do is Just Plain Awesome
1. Photo attachments
You can attached a photo (whether from your Camera Roll or one you take from within the 2Do app) or voice memo to a task. For many, this is just how life works–we want to take a picture of a bill and convert it to a task to remind us to pay it. Or we think of an idea and want to speak it rather than type it. 2Do allows you to make these inputs into tasks.
2. 2Do has a nice Today widget and good Share extensions in iOS.
They look like this, and give you a way to access the app from just about anywhere on an iPhone or iPad:
3. It’s easy to set up actions and tasks, recurring and otherwise.
Quickly adding multiple tasks to get things off your mind is a cinch:
Image via 2Do
What about setting recurring tasks? Easy as pie.
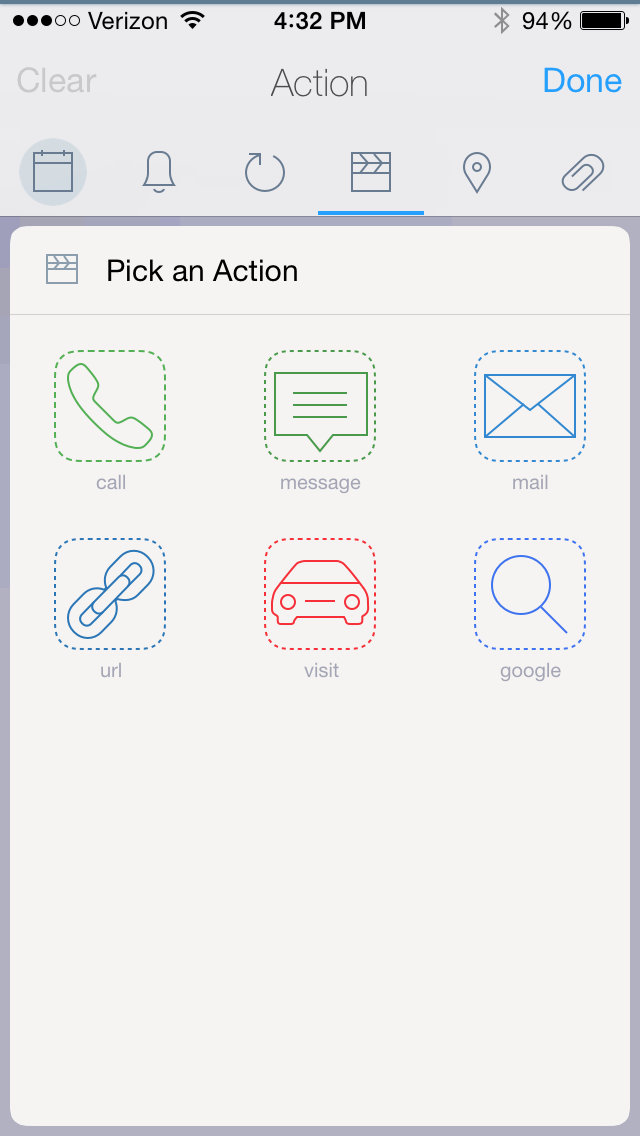
You can even “Pick an Action” in a task.
Selecting “Message,” I then get this option:
Want to make a shopping list, you say? 2Do has a nifty List (checklist) feature you can use:
4. There is good calendar integration.
Calendar integration–yes! It’s like Calendars 5, only far more robust than the task list in that app.
The app has even found a really elegant and easy way around the scroll wheel, for when you want to assign your task to both a due date and a due time:
So a task that’s all set up (no tags shown here) looks like this:
I’ve got a picture I took of an eye exam reminder, attached to the task, an action within the task to call (I just tap the green part and it dials), a reminder, a date and time… pretty smooth.
5. Did I mention how amazing it looks?
Here, I’ll show you:
Click to enlarge
The iPhone and iPad apps look even better:
Click to enlarge
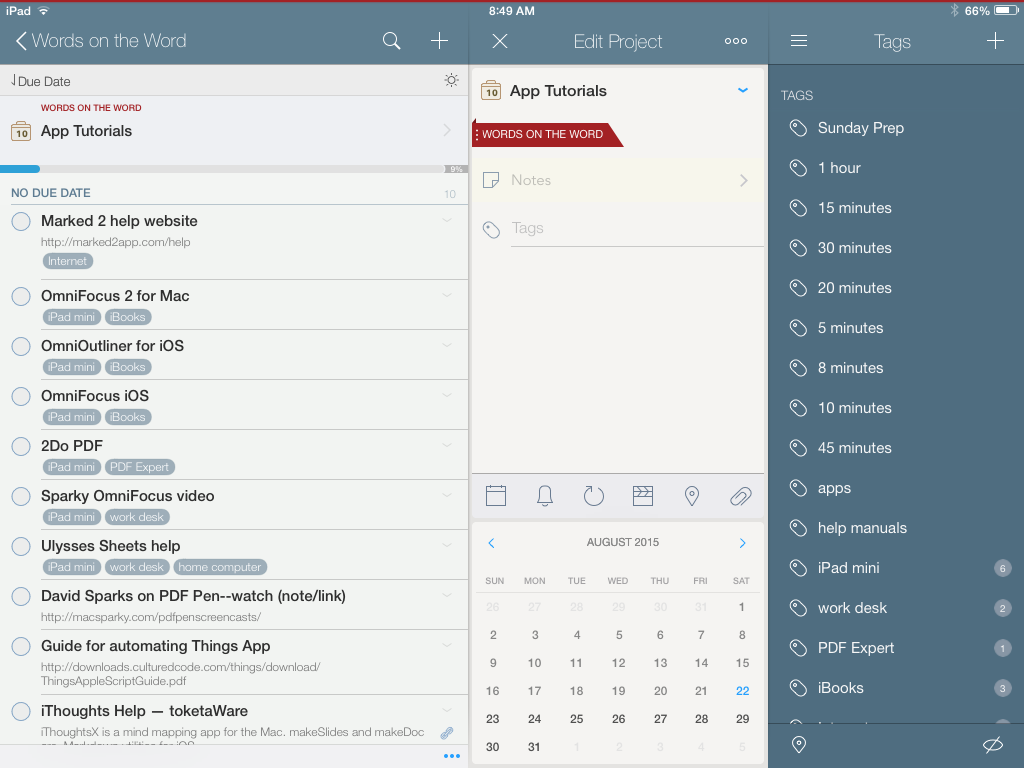
Note how 2Do shows you your tasks and your integrated calendar all together.
6. The iOS apps are some of the best-made apps in the App Store.
The makers of 2Do have really carefully thought this app through, including subtle touches like having a project’s color appear as a faint band on top of that project’s screen. You can easily swipe around from tasks to projects to tags to lists… navigation is very easy, and pretty.
You can even pinch zoom:
Image via 2Do
7. It’s got the power of OmniFocus, but with Tags.
You can see the Tags list in the images above. This allows you to customize your workflow to your heart’s content. You can also set up and save Smart Lists, i.e., searches you want to save to come back to. This is equivalent to OmniFocus’s custom perspectives. But something about actual tags makes it feel even more flexible.
—
There’s much more to say about this app, but I’m already at 1,000 words. If you want to learn more, you can find further documentation here.
If you’re starting from scratch with a task management app and have some money to spend, I can think of no good reason not to invest in 2Do, even over other options. It really is enjoyable to use. It’s powerful enough to help you track and execute multiple projects at once, yet simple enough to learn and start using right away.
You can find it in the App Store here (for Mac) and here (for iOS).
Thanks so much to the makers of 2Do for giving me a download in iOS and OSX for the review. Check out the app’s site here. I know this is a few days early for Apptastic Tuesday, but I couldn’t wait.
One of Evernote‘s best features is being able to email notes directly into Evernote. They give you an email address, and if you get an email that you want to file away for reference, you can send it right to Evernote. (You can even, if you word your subject line correctly, tag it and put it in a specific notebook.)
However, Evernote recently announced that you’d have to sign up for one of their paid plans if you wanted to keep your heretofore free email address. It’s not a huge sum, but I don’t plan to upgrade–I just don’t need the larger upload storage space at this point, which also comes with the paid upgrade.
The Mac Mail plug-in from ChungwaSoft was available long before Evernote changed their pricing structure, and I used it regularly then. Now it’s an essential part of my workflow.
Here’s how it works.
1. I get an email, the contents of which I want to file in Evernote.
An email about the Septuagint. What could be better?
Look again at the image above–at the top right you’ll see the Evernote elephant icon. That’s because I have EverMail installed in my Mac Mail app.
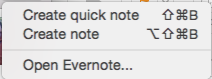
2. I click the EverMail icon, which gives me three options.
3a. I choose “Create quick note,” which I can select with mouse/trackpad or via keyboard shortcut.
I can quickly save my email to any notebook. The shot above doesn’t show it, but I now have it set up to default to my “Inbox” notebook in Evernote.
3b. I select “Create note” to further customize my email/note before sending to Evernote.
From here I can not only select the desired Notebook and tags, I can set a reminder, adjust the Note title, add my own notes to the link I’m saving, and even include email attachments so they save to Evernote, too.
This is actually even an improvement on emailing to Evernote, because now I don’t have to remember the right subject line syntax for adding tags and sending to a proper Notebook. I can do everything from within Mac Mail and not even have to open Evernote.
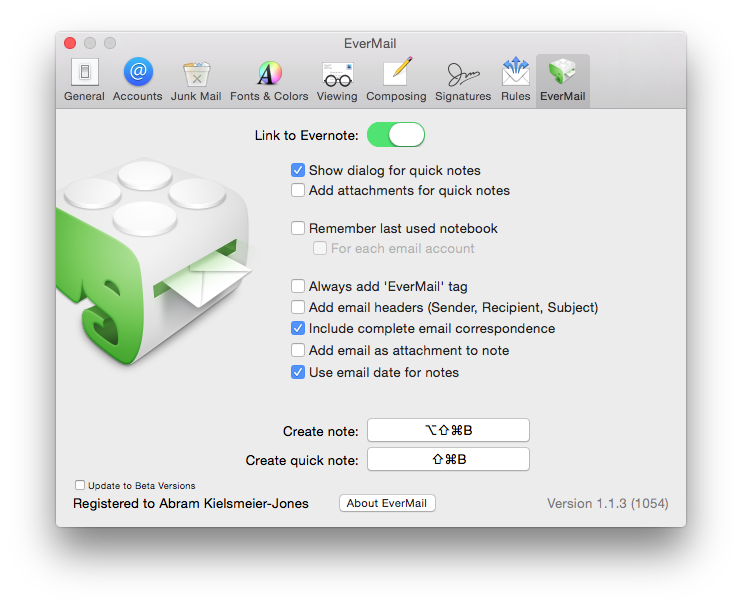
Once you install EverMail, you’ll see it in your Mail toolbar:
And here are the settings–EverMail puts itself right into your Mac Mail Preferences:
I mentioned free earlier. EverMail is not free, but at $13.95, you’ve got yourself a permanent email-to-Evernote solution that you don’t have to keep paying for each month.
Setup and use have both been exceedingly easy. I’m a big fan of the app. Check it out here.
Thanks to the good people of ChungwaSoft for giving me a download of EverMail for review purposes.
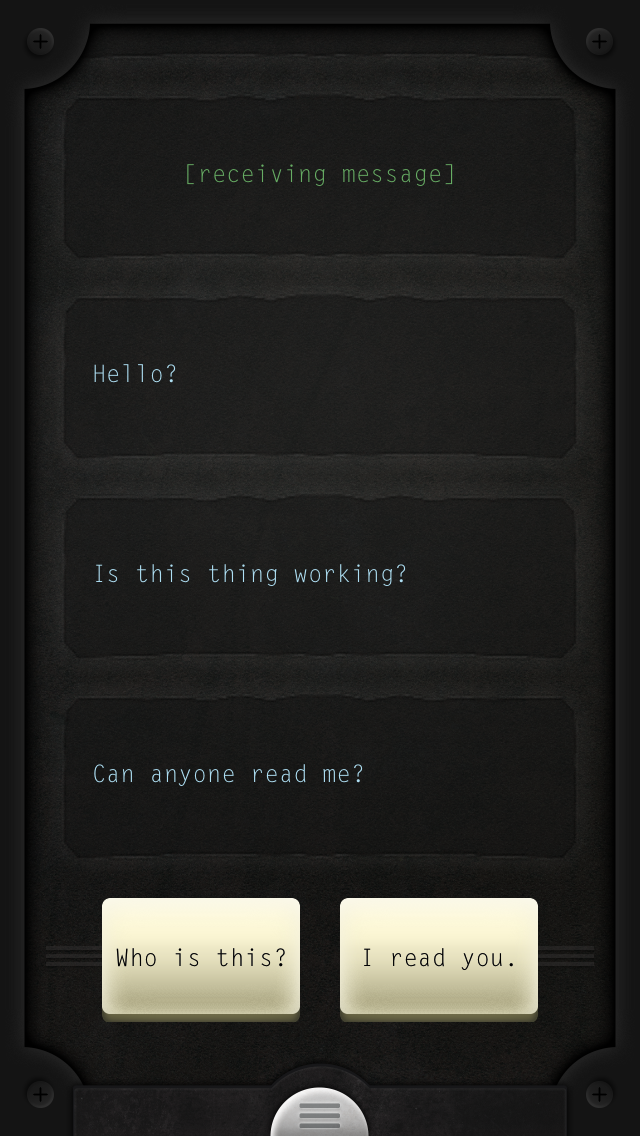
Lifeline begins with your receiving a transmission from “Taylor,” a man or woman who is stranded (and alone…?) on a strange planet. Maybe “game” is the wrong moniker for this app–it’s really more of an interactive experience, similar to the Choose Your Own Adventure novels of days gone by.
Lifeline: The Basics
It starts like this:
And away you go! From here on out, it’s as if you’re interacting with Taylor, complete with realistic overnight pauses in communication as s/he goes to sleep for the night.
Taylor’s funny, even amidst dreary circumstances:
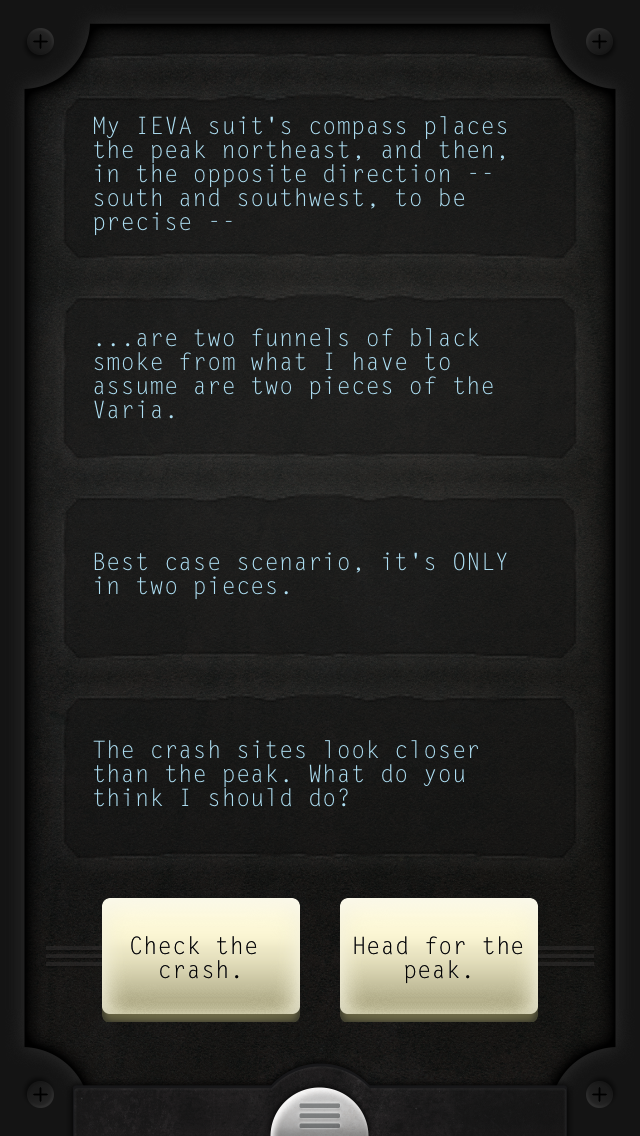
Your first choice with fairly serious consequences comes early in the game:
Off Taylor goes, and you wait:
One of the coolest things about the app is the on-screen notifications you get even when you’re not “playing”:
You can even respond without unlocking your phone:
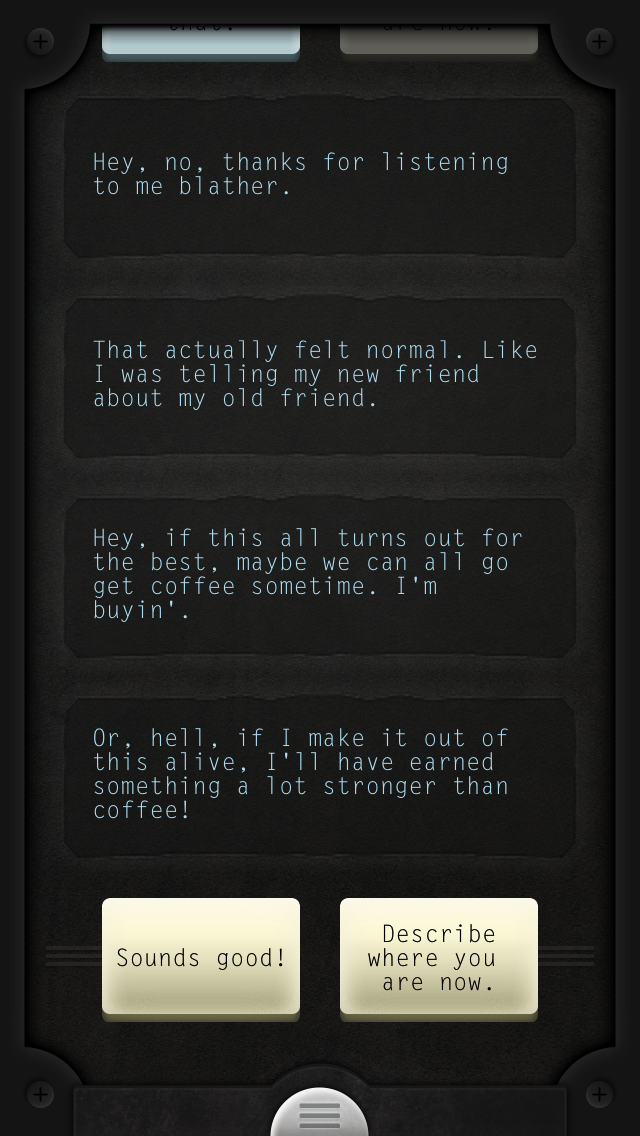
For the most part Taylor will do what you say, though it is not uncommon to have your wisdom second-guessed. After a little banter, though, Taylor will ultimately follow the path you suggest.
Evaluation (Insignificant Spoilers Below)
I had way more fun playing Lifeline that I thought I would. And I was much more drawn into the story than I expected to be.
The pacing of the story (i.e., how often you receive notifications and the real-life waiting time overnight or while Taylor is walking somewhere) is nearly flawless. You really have to spend three to four days to get Taylor to the end. Well… unless you make bad decisions early on.
I was actually pretty happy with myself that I got Taylor safely off the planet on the first try.
After you finish the story you get the option to go back again, this time with no delays, which is a really nice way to quickly try other paths.
When I went back to try new scenarios, I realized that you can get him/her killed the first day pretty easily!
The phone notifications are just like any other app’s notifications, though when you’re immersed in the game they sort of feel like text messages. There is no sound with the message notification, and I couldn’t find a way to change this setting. At first I found this a bit frustrating, but was actually glad for it as the days went on, so that I wasn’t constantly interrupted by Taylor. (You can adjust notifications in the settings otherwise.)
One mildly vexing thing about the game is that it’s not uncommon that after you make a decision for Taylor, s/he confirms that it was a good (or maybe not-good) decision by giving you more detail about surroundings… detail s/he already had and that would have been very useful before offering advice! E.g.:
But I can’t tell if this is a frustration with the game-writing or the character. Not a big deal either way.
Lifeline is great. It’s available in the iOS App Store right now (see here). It’s also available on other platforms, and rumor has it that Lifeline 2 is coming soon…. Check out the game in more detail here. And go here for a fascinating behind-the-scenes write-up.
Thanks to the good people of Big Fish Games for giving me a download of Lifeline for review purposes. Find my other Apptastic Tuesday reviews here.
The exquisitely designed 2Do app is Apple’s App of the Week in the iOS App Store. It’s usually $15 but is now free. The accompanying Mac app is 50% off, too.
I’ve reviewed Things and OmniFocus, and will soon review 2Do.
For now I can simply say: this is one of the most robust and beautifully designed apps I’ve seen on iPhone or iPad. The developers have–with their imagination and execution–far exceeded what one sees in a typical iOS app.
Read all about the iOS features here. Download it free (for a few more days) here.
Back in the days before Facebook and iPhones, I walked around my college campus with a mini-cassette recorder to capture my freshman year pontificating about all aspects of life. It’s amazing how lengthy and involved some of those reflections were.
After a while I started holding forth verbally less and rocking out musically more, using the recorder to get all my songwriting ideas down right away.
For as advanced as the iPhone is–and it includes a built-in voice memo recording app–it wasn’t until I started using the app Say & Go that I started treating the phone as a suitable replacement for that Sony tiny tape recorder.
First, let me show you how I use the app, then I’ll show you a few of the under-the-hood settings you can tweak.
A brilliant idea comes my way, I grab my phone, and launch Say & Go:
Because of how I have the app configured, the second I tap the app icon, it starts recording:
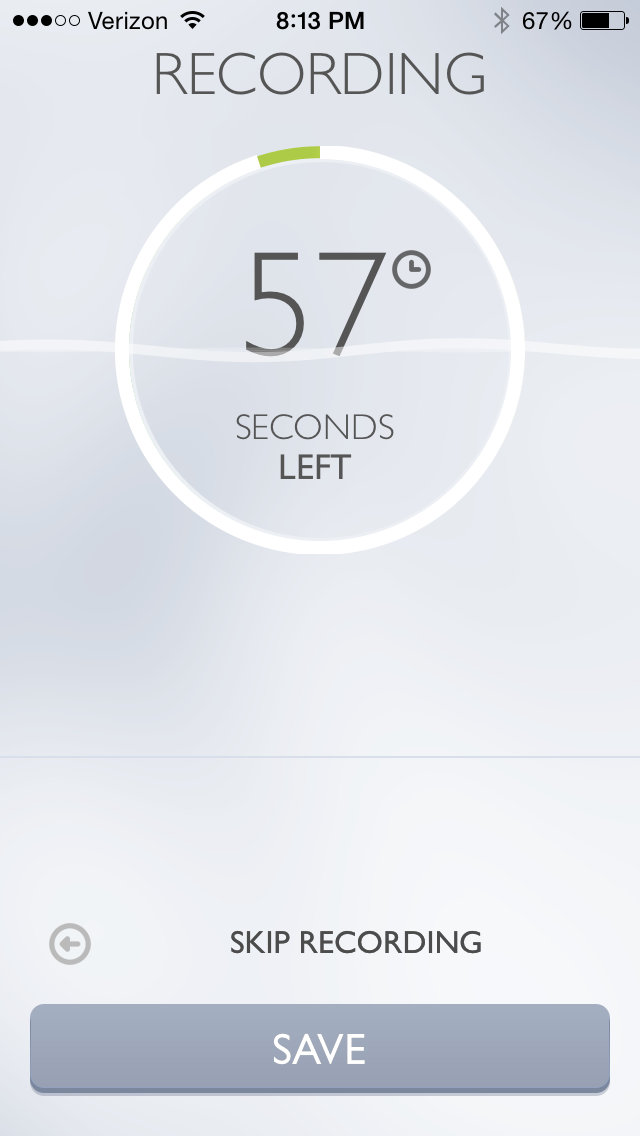
The app intentionally limits recording length to anywhere between 4 and 15 seconds. I find 9 seconds is a good amount of time to get most ideas down. But what if I want to record a song snippet?
I can simply swipe right or tap on “Longer Recording” in the image above to get a minute-long option:
As if this isn’t sleek enough (and what a sweet, elegant layout this app has), the best part of the app is what’s next: I can now send my recording to an email address of my choosing, or set the app to save the recording to my Dropbox or… wait for it… to Evernote.
All I had to do was enter my Evernote email-to address in the “Default E-mail Recipient” line above. Now, after a single tap on the icon on my home screen, all my recordings go straight into Evernote as soon as the recording time runs out. Impressive.
There are a few other customizable settings. In the short workflow described above, I have “Autostart” enabled, but you don’t have to:
And here are some of the other settings you can adjust:
It’s a brilliantly designed and useful app. Read more about it here.
Thanks to Dawid Pietrala, the developer of Say & Go, for giving me a download for the review. Check out the app’s iOS page here. See my other AppTastic Tuesday reviews here.
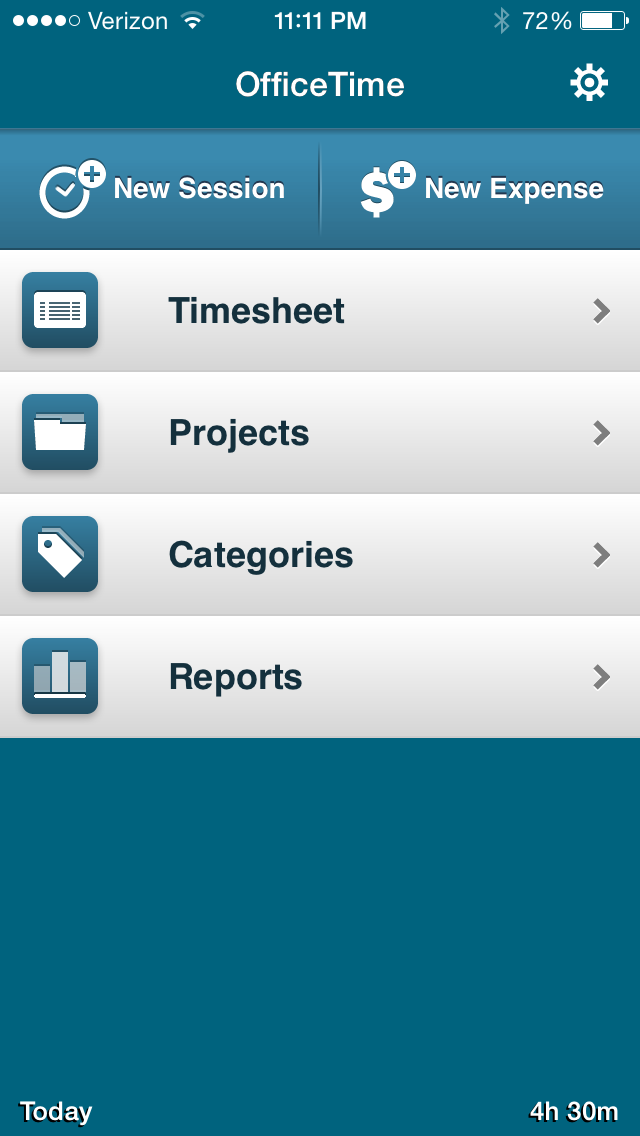
The best iPhone time tracker I’ve seen is OfficeTime. It is simple, fast, effective, and easy to get in and out of quickly to start tracking time and get right back to work.
You can set up your Projects and Categories (I use these as two levels of task grouping), and tap on each to see how much time you’ve spent in a certain part of your work. I don’t use the Expenses feature of the app, but if you were a sub-contracting consultant keeping track of work for multiple clients, OfficeTime would be immensely helpful in tracking billing.
Pulling up a new time/task entry is easy:
“Notes” allows you to write more details about what task you’re working on.
Not only can you look at all your time entries in a week by Project and Category, but you can see (as below) a virtual Timesheet of your week.
The iPhone app can sync automatically to the desktop version of OfficeTime, though you have to actually be on the same wireless network to do it. Similarly, the iPad app can sync to a computer (and vice versa), but the data cannot sync automatically between iPad and iPhone apps. That is one of the few drawbacks I’ve found in OfficeTime.
I’ll post more in a future review about the desktop app, and also report back on exporting features.
The lack of a full-bodied sync option hasn’t really stopped me, though, since I can keep all the data on my phone and then sync with my work computer when I’m in the office.
OfficeTime has a free Mac trial version, and a free iOS version to try here. The paid iOS version is $7.99 and works on both iPhone and iPad.
If you are the time tracking sort, and want a full-bodied way to keep track on the go, OfficeTime officially rates the Words on the Word title of AppTastic.
Thanks to the makers of OfficeTime for giving me a download for the review. Check out the app’s iOS page here. See my other AppTastic Tuesday reviews here.